NovelAI aka NAI Diffusion is an anime image generator that was released in October 2022.
Here's our full review of the image generator on the official website. The tool requires a monthly subscription to use and the cheapest plan is $10.
You can however, run NovelAI for free on your own computer and get the exact same outputs as the paid version:
The installation process takes 10 minutes, minus download times. You'll need around 10GB of free space on your hard drive.
Common points of confusion:
- People refer to both the official website and the local model as NAI Diffusion or NovelAI.
- The local model is sometimes referred to by its filename, animefull, or animefull_final
To run the local model, you will need to download a User Interface to go with it.
In this guide, we'll show you how to download and run the NovelAI/NAI Diffusion model with the AUTOMATIC1111 user interface.
Let's get started!
Installation
Before proceeding with installation, here are the recommended specs:
- 16GB RAM
- NVIDIA (GTX 7xx or newer) GPU with at least 2GB VRAM (AMD GPU will work, but NVIDIA is recommended)
- Linux or Windows 7/8/10/11 or Mac M1/M2 (Apple Silicon)
- 10GB disk space (includes models)
1. Download the model file
The model is all the stuff the AI has been trained on and is capable of generating. Model files end in the extension '.ckpt' or '.safetensors'.
As mentioned, we'll be downloading animefull (which is just what people call the NovelAI/NAI Diffusion model).
Note: Right now, there are much better anime models out there. You can try them while following the rest of this guide, the model file is interchangable.
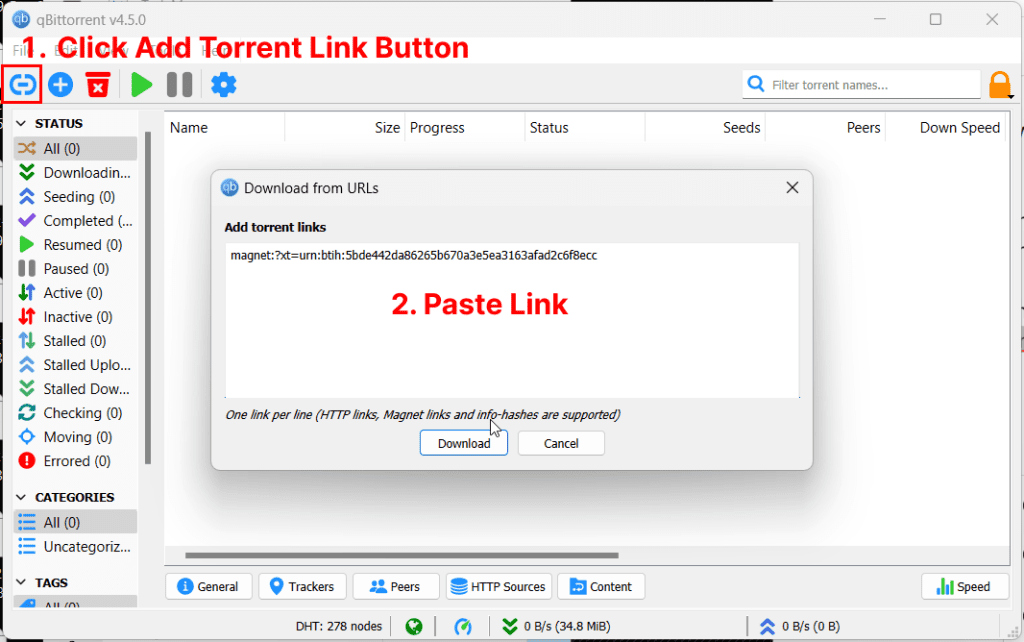
Download a torrent client if you don't have one already. I recommend qBittorrent (works on Windows/macOS/linux).
Add the following torrent magnet link:
magnet:?xt=urn:btih:5bde442da86265b670a3e5ea3163afad2c6f8ecc
Deselect everything except for the the subfolder "animefull-final-pruned" and the file "animevae.pt" (both are located in the /stableckpt folder)
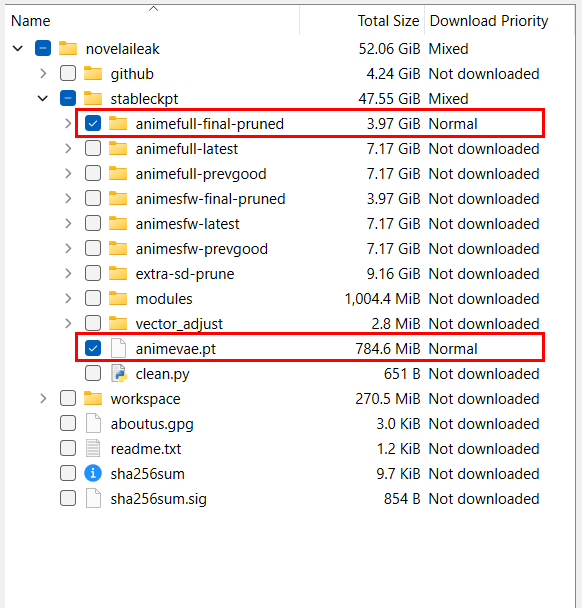
You will notice there are pruned models and unpruned models. A pruned model is just a compressed model. Most people use the pruned one.
While the model is downloading in the background you can move on to the next step.
2. Download the Web UI
This is the user interface you will use to run the generations.
The most popular user interface is AUTOMATIC1111's Stable Diffusion WebUI.
You'll notice it's called the Stable Diffusion interface.
Stable Diffusion is the name of the official base models published by StabilityAI and its partners, but it is used colloquially to refer to any of the custom models which people created using these base models.
Here are the installation instructions for the WebUI depending on your platform. They will open in new tabs, so you can come back to this guide after you have completed the WebUI installation:
- Installation for Windows (NVIDIA GPU): instructions
- Installation for Windows (AMD GPU): instructions
- Installation for Apple Silicon (Mac M1/M2): instructions
3. Place the Model in the Web UI folder
After your model finishes downloading, go to the folder "novelaileak/stableckpt"
You want the following files:
model.ckpt in folder stableckpt/animefull-final-pruned- This is the model file. This is the only one you actually need.
config.yamlin folderstableckpt/animefull-final-pruned- Configuration file
animevae.ptin folderstableckpt- This is the Variable Auto Encoder (VAE). Image generation is done in a "compressed" way, and the VAE takes the compressed results and turn them into full sized images. The end result is more vibrant colored images with better details.
Copy these 3 files into the folder stable-diffusion-webui/models/Stable-diffusion.
(stable-diffusion-webui is the containing folder of the Web UI you downloaded in the previous step)
Rename the files like so:
model.ckpt->nai.ckptconfig.yaml->nai.yamlanimevae.pt->nai.vae.pt(write it exactly like this)
You can actually name these files whatever you want, as long as the name before the first "." is the same.
Since you will be placing all future models into this folder choose a descriptive name that helps you remember what this model is.
4. Start the WebUI
- Windows: double-click
webui-user.bat(Windows Batch File) to start - Mac: run the command
./webui.shin terminal to start - Linux: run the command
webui-user.shin terminal to start
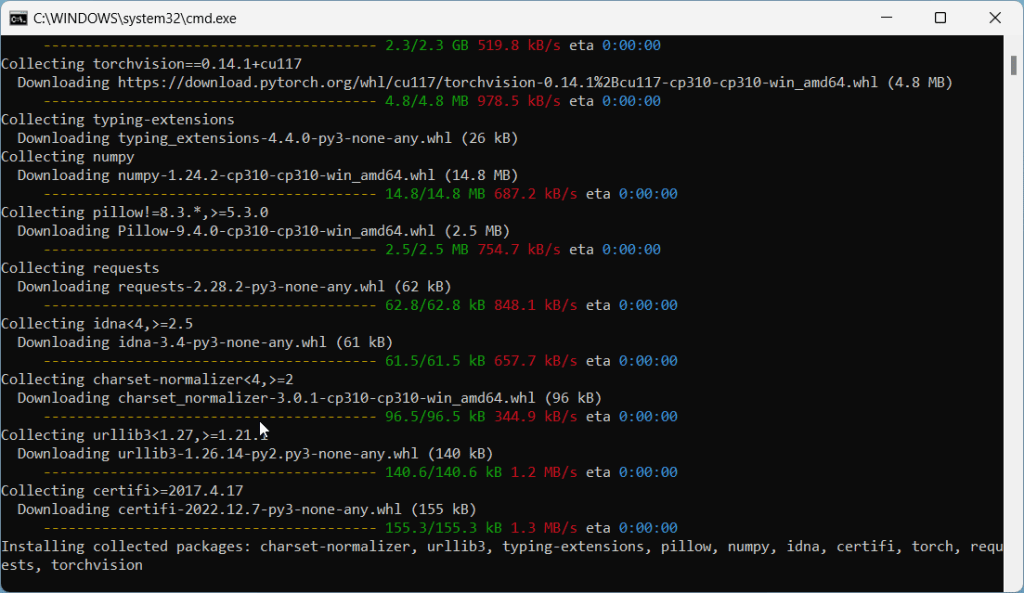
On the first run, the WebUI will download and install some additional modules. This may take a few minutes.
Common issues at this step:
RuntimeError: Couldn't install torch.
Fix: Make you you have Python 3.10.x installed. Type python --version in your Command Prompt. If you have an older version of Python, you will need to uninstall it and re-install it from the Python website.
Fix #2: Your Python version is correct but you still get the same error? Delete the venv directory in stable-diffusion-webui and re-run webui-user.bat
RuntimeError: Cannot add middleware after an application has started
Fix: Go into your stable-diffusion-webui folder, right click -> Open Terminal. Copy and paste this line into terminal and press enter:
.\venv\Scripts\python.exe -m pip install --upgrade fastapi==0.90.1See more common issues in the troubleshooting section.
Open WebUI in Browser
In my command prompt, I get the success message Running on local URL: http://127.0.0.1:7860
So I would open my web browser and go to the following address: http://127.0.0.1:7860.
Everything else works but not the web address
- Make sure you have not typed "
http://" by accident, the address should start with "http://" - In this example my web address is
http://127.0.0.1:7860. Yours might be different. Please read the success message in your Command Prompt carefully for the correct web address.
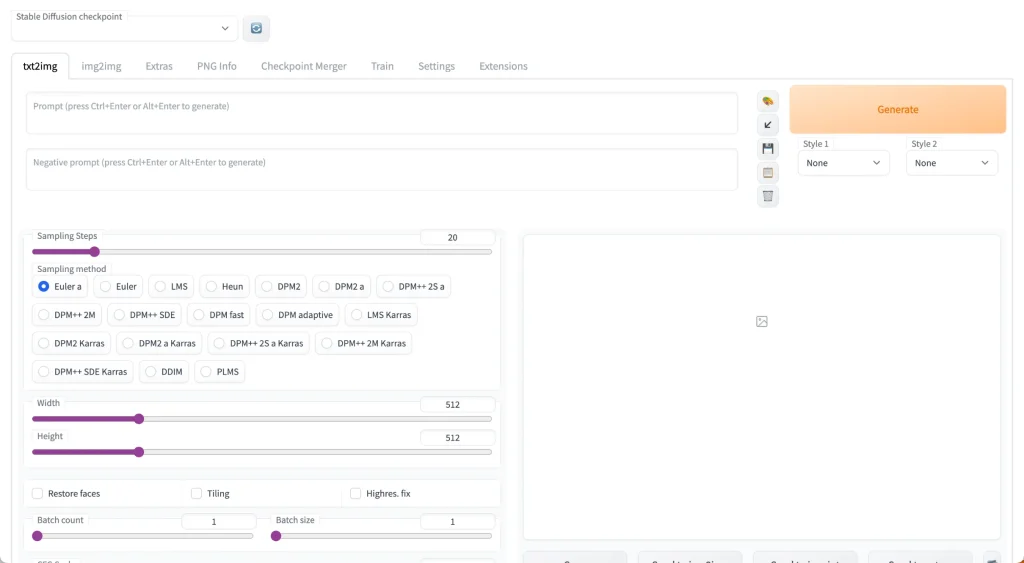
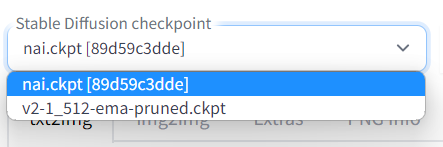
You'll notice at the top there's a toggle called "Stable Diffusion Checkpoint".
You can use this to switch to any model you have placed in the stable-diffusion-webui/models/Stable-diffusion folder. We'll choose the model we renamed nai.ckpt earlier.
If you put the model in the folder after you start the WebUI, you will need to restart the WebUI to see the model.
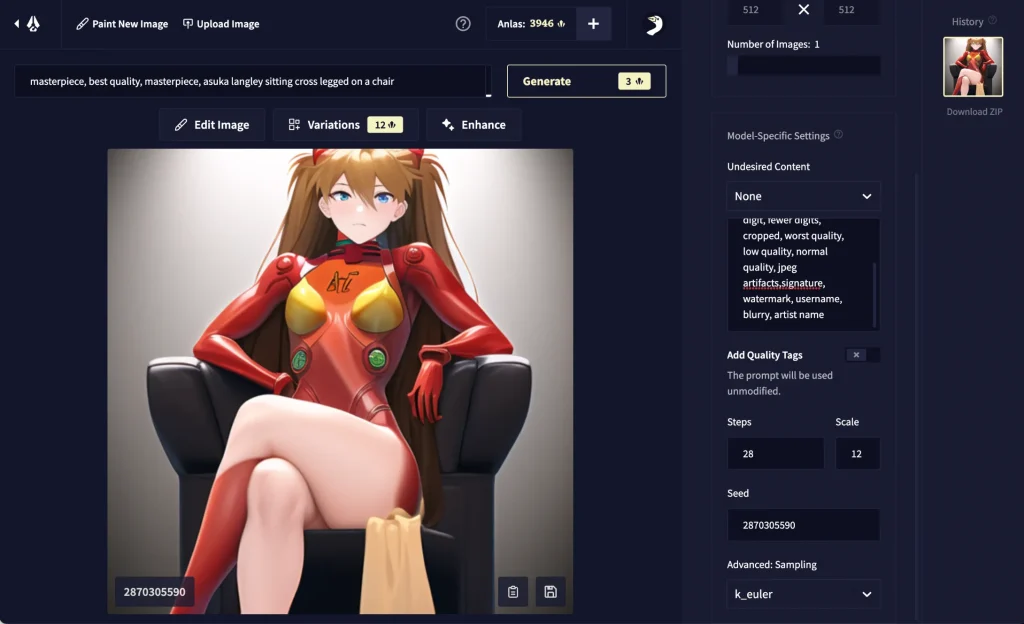
5. Hello Asuka
Hello Asuka is a calibration test used to verify that you have everything installed and configured correctly.
The paid NovelAI will generate this image of Asuka from Evangelion with 95%-100% accuracy when you use the right settings:

If you can recreate this image with your fresh Stable Diffusion & NAI install, then you are successfully emulating NovelAI.
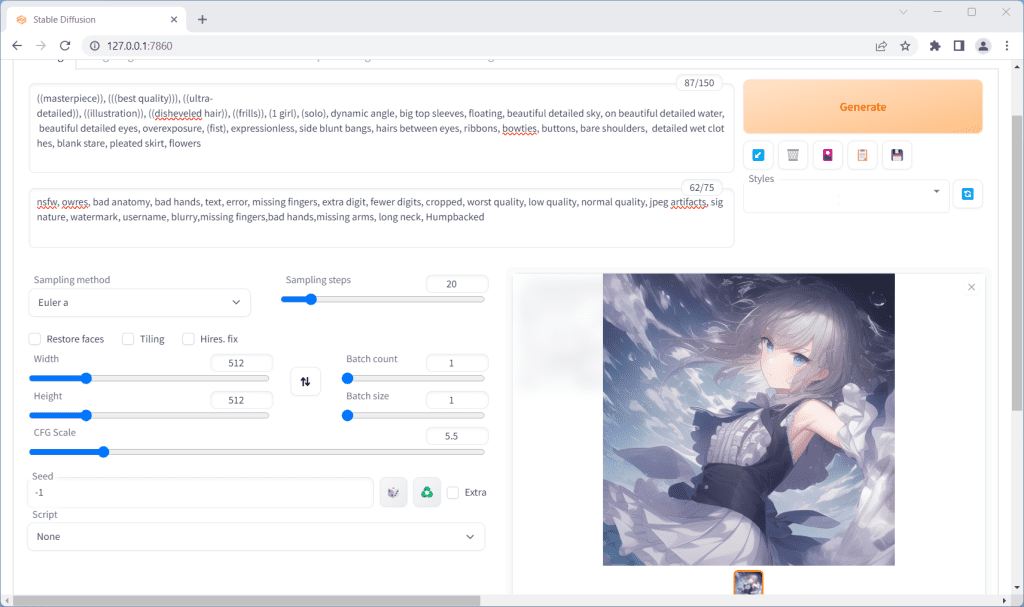
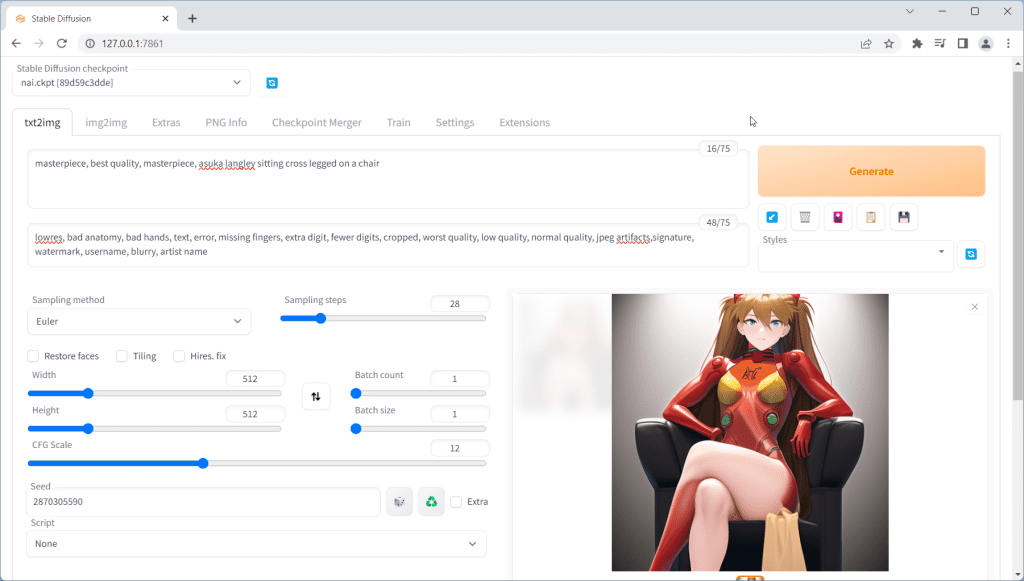
Go to the txt2img tab. Input the following values exactly:
- Prompt:
masterpiece, best quality, masterpiece, asuka langley sitting cross legged on a chair - Negative prompt:
lowres, bad anatomy, bad hands, text, error, missing fingers, extra digit, fewer digits, cropped, worst quality, low quality, normal quality, jpeg artifacts,signature, watermark, username, blurry, artist name - Sampling Steps:
28 - Sampling Method:
Euler - Width:
512 - Height:
512 - CFG Scale:
12 - Seed:
2870305590 - Then, go to the
Settingstab. Click on theStable Diffusionsection and look for the slider labeledClip skip. Bring it to2. Then clickApply Settingsat the top.
Click the big Generate button in the upper right corner, and wait for the image to complete:
How long does it take to generate an image?
Here's a rough estimate for image generation time depending on your GPU:
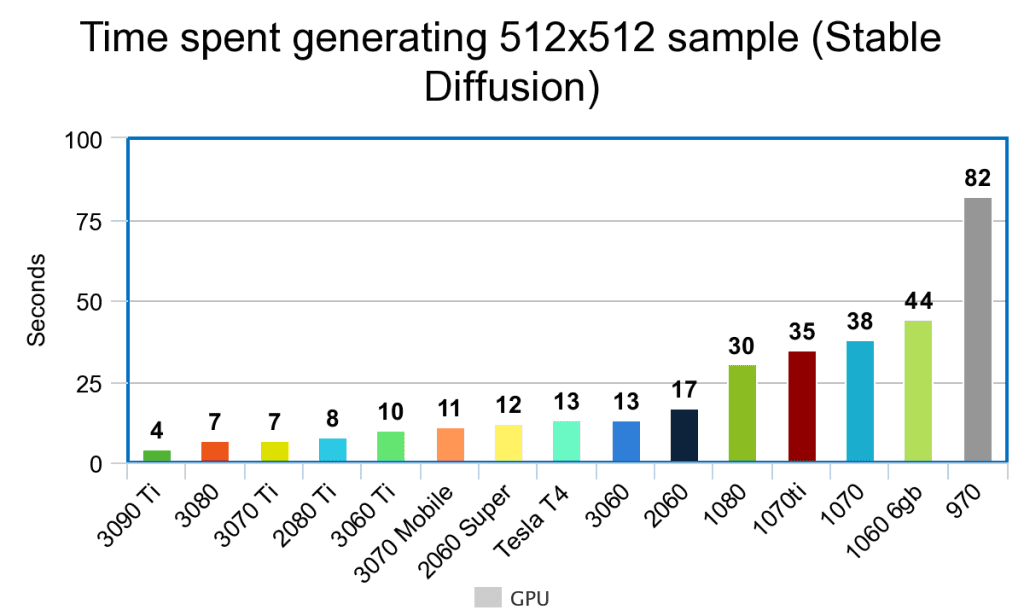
You can expect these benchmark times to go down as the developers keep on optimising the software for faster and faster generations.
Need a better GPU to generate images faster?
Check out this handy GPU guide.
My Asuka is messed up!
You want to get a result that is almost exactly the same as the target Asuka. "Close enough" probably means something is wrong.
Here are some reasons why you might not be getting the correct Asuka:
- You are not using the VAE (
.vae.pt) file and the configuration (.yaml) file. Check Step 3 again. - Make sure you are using
Eulerfor the sampler and notEulera - Make sure you are using the correct model. Check the
Stable Diffusion checkpointdropdown on the top. If your model is correct, the number[89d59c3dde]or[925997e9]should appear after the model name. - Verify that you have entered all the settings correctly: Prompt (did you miss copying a letter?), Negative Prompt, Steps, CFG scale, Seed, Clip Skip in the settings etc.
- You are running Stable Diffusion on your CPU. Not only is this very slow, you will also not be able to pass the Asuka test.
- You have a NVIDIA GTX 1050ti. This specific GPU is known not to be able complete the test.
- You are using a Mac. Macs are known to have trouble completing the test.
Full list of common errors with examples.
Don't fret if your computer cannot complete the Asuka test. You can still generate high-quality images (it just means you cannot emulate NovelAI 1:1).
NovelAI Emulation
To show you how close the emulation actually is, I've input the exact Asuka test settings into the official NovelAI website:
Here are the results compared:


You'll notice the only difference is the sharpness of the separation of the red leg. This difference is acceptable because it is caused by launching the WebUI with custom parameters (--medvram, --lowvram, or --no-half ).
You can use the same settings you did in the Asuka test to emulate any NovelAI image. That is:
- Set the sampler to Euler (Not Euler A)
- Use 28 Steps
- Set CFG Scale to 11
- Use
masterpiece, best qualityat the beginning of all prompts - Use
nsfw, lowres, bad anatomy, bad hands, text, error, missing fingers, extra digit, fewer digits, cropped, worst quality, low quality, normal quality, jpeg artifacts, signature, watermark, username, blurry, artist nameas the negative prompt - In the Settings tab click Stable Diffusion sub-section, and change the Clip skip slider to 2 and then click "
Apply settings"
Prompting
Basics
- AUTOMATIC1111 does not save your image history! Save your favorite images or lose them forever.
- Begin your prompts with
masterpiece, best quality(the NovelAI website does this by default). - Start with the following in the Negative prompts:
lowres, bad anatomy, bad hands, text, error, missing fingers, extra digit, fewer digits, cropped, worst quality, low quality, normal quality, jpeg artifacts, signature, watermark, username, blurry, artist name - Use
-1in the seed field to randomize it, or specify a seed to ensure consistency across generations.
I've written some detailed prompt techniques to improve your image results.
If you are using this guide, replace {} with (). Stable Diffusion uses () while the NovelAI website uses {}.
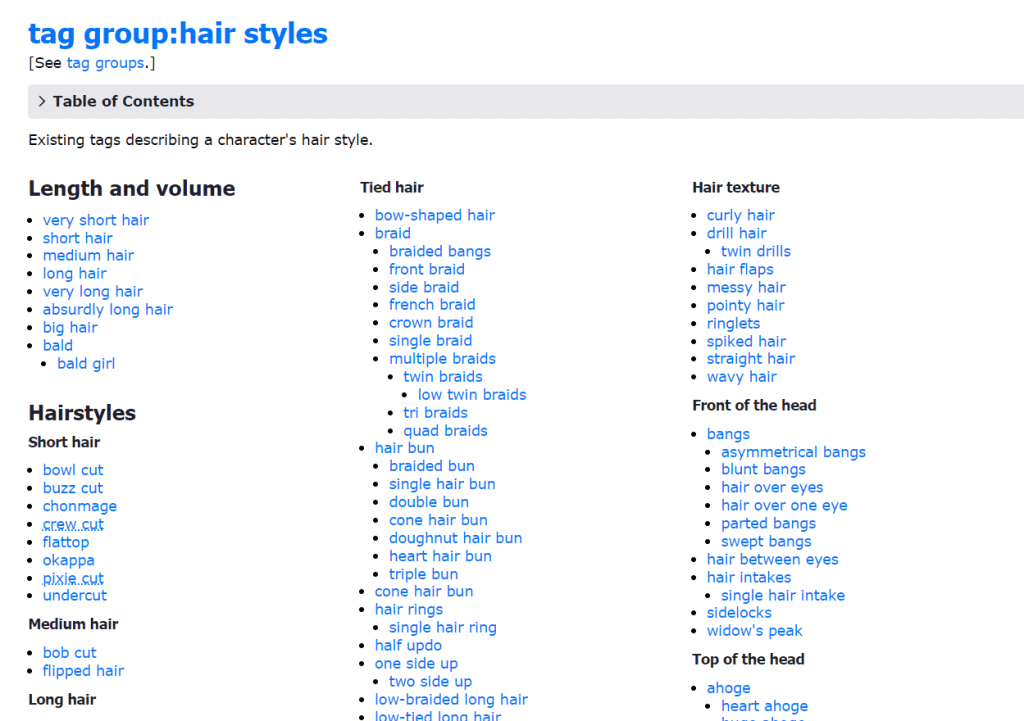
Danbooru Tags
The fastest way to improve your prompting is by checking out Danbooru tag groups.
For the unacquainted, Danbooru is the largest anime imageboard (as well as one of the top 1000 websites in the world by traffic).
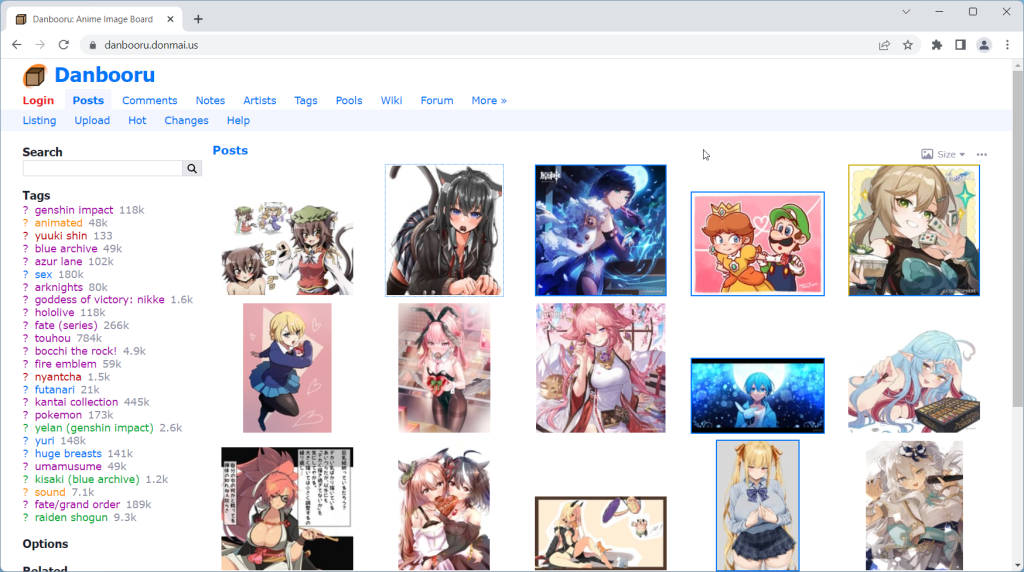
All anime models use Danbooru for all/part of their training data.
The reason Danbooru makes such a good dataset for AI/ML models is its robust tagging system. Every single image has tags that summarize everything in the image, from the major categories (artist, character, fandom) to the tiniest of details (‘feet out of frame‘, ‘holding food‘, ‘purple bowtie‘, etc).
If a Danbooru tag has 1K+ images, there is a high likelihood that NovelAI 'knows' what it is. Check individual tags to make sure they have enough images.
This explains why NovelAI can't generate some 'popular' characters.
The characters simply don't have enough fanart on Danbooru.
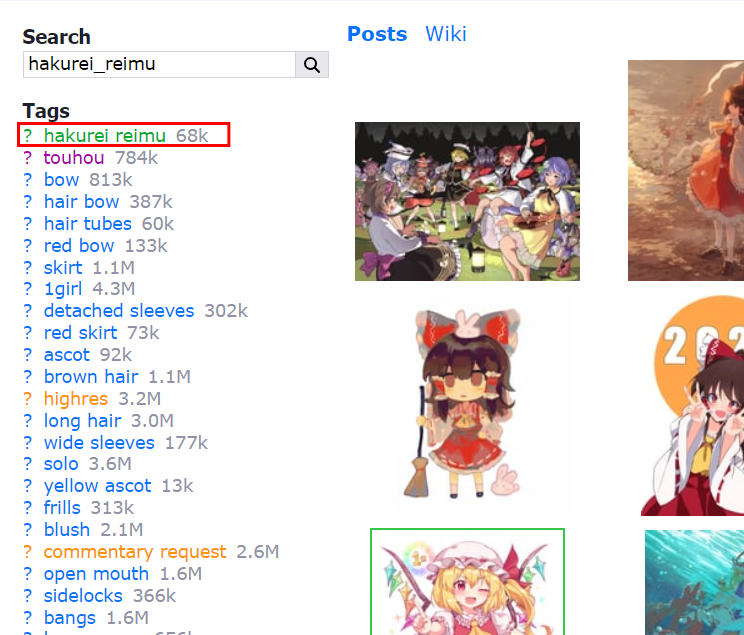

masterpiece, best quality, hakurei reimu
masterpiece, best quality, hatsune mikuTip: For characters, you'll get the best results by writing character names exactly as they are tagged in Danbooru.
Prompting Guides
Here are the best resources I've found so far (email me if you have something you'd like to add to this list):

P1atdev
Most comprehensive NovelAI prompt library for all character features. Only in Japanese.
http://p1atdev.notion.site/p1atdev/611b109989c54ffca6219edd95d1b247

Codex of Quintessence
Gigantic Chinese tome of prompt knowledge, divided into multiple scrolls.
Models to try next
NovelAI/NAI Diffusion is the model that started anime generation. It's a culturally and historically significant model.
Many models have been released since, that use NAI as a base and greatly improve its quality and versatility. Here are some recommendations:

High quality model created by fine-tuning NAI. The most popular anime model, and for good reason. Try this one next.


For more models, check out this full list of anime models.
NSFW Capabilities
NAI Diffusion has NSFW capabilities but they are outside the scope of this website. Check out these Stable Diffusion NSFW prompt resources.
Next Steps
Models and new features for the WebUI are coming out every day.
Try the rest of our guides in the Stable Diffusion for Beginners series:
Part 1: Getting Started: Overview and Installation
Part 2: Stable Diffusion Prompts Guide
Part 3: Stable Diffusion Settings Guide
Part 3: Models
Part 4: LoRAs
Part 5: Embeddings/Textual Inversions
Part 6: Inpainting
Part 7: Animation
Troubleshooting
Fix: Make you you have Python 3.10.x installed. Type python --version in your Command Prompt. If you have an older version of Python, you will need to uninstall it and re-install it from the Python website.
Fix #2: Your Python version is correct but you still get the same error? Delete the venv directory in stable-diffusion-webui and re-run webui-user.bat
Fix: Go into your stable-diffusion-webui folder, right click -> Open Terminal. Copy and paste this line into terminal and press enter:.\venv\Scripts\python.exe -m pip install --upgrade fastapi==0.90.1


When I run webui-user.bat (step 4), after a while it shows a long message that ends with “MemoryError”, and some lines above there’s “RuntimeError: Couldn’t install torch”, what should I do
Make you you have Python 3.10 installed. Type
python --versionin your Command Prompt to checkDelete the venv directory in stable-diffusion-webui and re-run webui-user.bat
Hi do i need i good computer for running it?
Do you know the minimum required?
Hey Joooh!
The minimum requirements are:
-16GB RAM
-Nvidia (GTX 7xx or newer) GPU with at least 2GB VRAM
-Linux or Windows 7/8/10+ or Mac M1/M2 (Apple Silicon)
-10GB disk space (includes models)
what are the minimum specifications? how much space do you need for the hard disk? how much ram do you need? does it support all types of nvidia?
Minimum requirements are:
-16GB RAM
-Nvidia (GTX 7xx or newer) GPU with at least 2GB VRAM
-Linux or Windows 7/8/10+ or Mac M1/M2 (Apple Silicon)
-10GB disk space (includes models)
Hi, I see “You are not using the vae (.pt) and config (.yaml) files. Check Step 3” for troubleshooting.
However, Step 3 says nothing about these two things. did i miss something or could you help me out on this part? thanks!
Aine – sorry for the omission. I have updated the article.
Oh, it’s not a problem at all, thank you so much for taking the time to update. It’s working perfectly now, I got the correct Miss Asuka!
Great to hear it! Happy prompting
Hola buenas cuando hago el paso 3 y luego ejecuto la aplicacion da error pero sin embargo si al modelo le pongo de nombre model funciona pero no aparece la misma version en el navegador
Esta buen si no ves el nombre model, significa que esta usando el modelo default. Que pasa si intentas descargar otro modelo y los pones en el mismo folder?
Hello,
I have this error when running “webui-user” > ERROR: Could not install packages due to an OSError: [Errno 28] No space left on device”.
But I have 400+ GB free space on the drive. Any tips?
Thanks
Hey Sza, what happens if you delete your temp files?
Copy and paste:
rm -r /tmp/
Hello,
Sorry for the delay and thanks for the replay. I got the same error even after deleting the tmp folder :/
Kr
Ciao
ho provato a scaricare il torrent ma mi dice che la sorgente non e’ presente.
Dove aggiornare il link?
Grazie e scusate il disturbo
Ciao
ho aggiunto un link
grazie per l’avviso
I did everything fine but when I tried to lauch the web UI, the command prompt says this:
ERROR: Could not find a version that satisfies the requirement torch==1.13.1+cu117 (from versions: none)
ERROR: No matching distribution found for torch==1.13.1+cu117
[notice] A new release of pip available: 22.2.1 -> 22.3.1
What do I do?
Make sure you have Python 3.10 (type
python --versionin command prompt to check)If you have the correct Python, delete venvfolder in WebUI folder and try running the WebUI again
I’m trying to use Orangemix model, but I cant seem to find a config.yaml file in there. I only found the model ckpt and vae.pt files.
Hey Stella, the config file is optional. Sometimes the model creators do not create or provide one. I don’t think there’s one for Orangemix.
My model number is not correct, the number I have is [89d59c3dde] instead of [925997e9]. I downloaded The model using the Direct Download link (Mega)
Hey Sam, it appears the hashing method was changed a few weeks ago. [89d59c3dde] is correct. I will update the article, apologies for the confusion.
Does the Asuka test work properly for you?
I seem to have the wrong model number. I have [89d59c3dde] instead of [925997e9]. The Asuka result I get is the same as the clip skip 1 image. I tried both the torrent and MEGA to get the models and pasted it into the stable-diffusion-webui/models/Stable-diffusion folder but the model number is never the correct one.
Hey Yubiland, it appears the hashing method was changed a few weeks ago. [89d59c3dde] is correct. I will update the article, apologies for the confusion.
You have set your Clip Skip to 2 and are still getting the 1 image?
Same problem here. I read your article, but the is no settings like “stop at last layers of clip model”.
Hey Tofel, it is the setting called “Clip Skip” under the Stable Diffusion section in the settings.
Pretty sure I followed the instructions up to step 4 to a T, but trying to launch webui-user.bat doesn´t do anything for me. A window appears for a brief second on the taskbar and immediately goes away.
Try re-installing the WebUI, this time make sure it is on C: drive, and make sure there are no spaces in the path name (no spaces in any of the containing folder names)
I have the wrong stable diffusion checkpoint number at the top, even though I direct downloaded yours. I have 89d59c3dde. How do I fix this?
I just noticed the other comment about this. I just have the wrong image with all the same settings. Will troubleshoot some more.
Youre such a goat for making this tutorial. Bless you and I hope only the best happens to you!
Hey Daniel, I’m glad you found it helpful!
Hi, where can I check whether I’m using CPU or GPU? I checked everything else and can’t find the issue (or is a GTX1050 as bad as a 1050ti?)
It sounds like you’re definitely using GPU. I haven’t heard of the 1050 having the same problems as the 1050ti but this could be the case if you’ve checked and every other variable is correct.
Hi, after clicking Generate, I keep having the error below. Even if I don’t input something, it’s just like that.
RuntimeError: “LayerNormKernelImpl” not implemented for ‘Half’
Should I copy the whole error?
I am using rx580 4gb.
Thanks
I already solved it, just add –precision full –no-half in COMMANDLINE_ARGS.
Anyways, how do we know if we are running Stable Diffusion on CPU or GPU?
Sorry for the delayed response. I realized shortly after writing my comment that I hadn’t pressed the APPLY SETTINGS button at the top and assumed that dragging the slider would automatically save the setting. Everything is fine on my end.
Glad to hear it!
Hi, everything seems to work fine, till the step, to start the Web UI, where my command prompt returns this error at the end, after it says it is running at the local URL:
“raise RuntimeError(“Cannot add middleware after an application has started”)
RuntimeError: Cannot add middleware after an application has started”
I have tried to check the local URL after that, and it shows nothing. Any idea how to resolve this problem? Thanks!
Try this: right click the stable-diffusion-webui folder and click “Open in Terminal”
Copy and paste the following command and press enter:
.\venv\Scripts\python.exe -m pip install –upgrade fastapi==0.90.1
Now try running webui-user.bat again (will not need to re-install modules)
Has anyone encountered the problem of Cannot add middleware after an application has started ?
After launching the web ui-user.bat file, processes go on, then outputs the ip for connection, but then apparently tries to add some program and gives an error.
An error appeared after installing a new video card.
Try this: right click the stable-diffusion-webui folder and click “Open in Terminal”
Copy and paste the following command and press enter:
.\venv\Scripts\python.exe -m pip install –upgrade fastapi==0.90.1
Now try running webui-user.bat again (will not need to re-install modules)
my webui doesn’t start up for some reason, I keep getting Access is denied.
Access is denied.
venv “C:\Users\myname\Desktop\sd-webui\stable-diffusion-webui-master\venv\Scripts\Python.exe”
The system cannot find the path specified.
Press any key to continue . . ., how do I get through this issue?
I’m sure I’ve set it right, but no matter what it just doesn’t want to run
Hey! This should solve your problem, Python installation: (http://github.com/AUTOMATIC1111/stable-diffusion-webui/issues/1469)
Ok, so I fixed that, and I can make it say “Running on local URL: http://127.0.0.1:7860“, but now it is also saying that “To create a public link, set `share=True` in `launch()`.
Traceback (most recent call last):
File “C:\Users\Ethon\Documents\stable-diffusion-webui\launch.py”, line 362, in
start()
File “C:\Users\Ethon\Documents\stable-diffusion-webui\launch.py”, line 357, in start
webui.webui()
File “C:\Users\Ethon\Documents\stable-diffusion-webui\webui.py”, line 232, in webui
app.add_middleware(GZipMiddleware, minimum_size=1000)
File “C:\Users\Ethon\Documents\stable-diffusion-webui\venv\lib\site-packages\starlette\applications.py”, line 135, in add_middleware
raise RuntimeError(“Cannot add middleware after an application has started”)
RuntimeError: Cannot add middleware after an application has started”
I know that was a lot but any idea of what to do?
Try this: right click the stable-diffusion-webui folder and click “Open in Terminal”
Copy and paste the following command and press enter:
.\venv\Scripts\python.exe -m pip install –upgrade fastapi==0.90.1
Now try running webui-user.bat again (will not need to re-install modules)
I followed every step and everything seems to be working fine, until I tried to generate the image and I got this error down below `RuntimeError: Expected all tensors to be on the same device, but found at least two devices, cuda:0 and cpu! (when checking argument for argument index in method wrapper__index_select)`
tried to remove the venv file and reinstall the webui again but it seems to freeze my pc, I can’t run webui again, it freezes on this part `Collecting torch==1.13.1+cu117`
Hey Zen, I haven’t encountered this personally but from what I’ve read this error comes from including –medvram or lowvram in your webui-user.bat file. Try removing them and seeing what happens.
I’m running BitComet and I’m getting tons of blocks from my malware program due to Trojan warnings. Is there another magnet link that is less sketchy?
Edit: Nevermind, it just took awhile to get through the initial blocks.
Glad it worked out.
Hi, when I try and generate the image, I get this error down below:
RuntimeError: Expected all tensors to be on the same device, but found at least two devices, cuda:0 and cpu! (when checking argument for argument index in method wrapper__index_select)
Hey Zen, Try adding the following to your webui-user.bat:
set COMMANDLINE_ARGS=--precision full --no-half --lowvram --always-batch-cond-uncond --opt-split-attentionI am currently running a 7900xt and 5800x3d and am having an issue when running webui-user.bat and don’t know what to do, I know AMD doesn’t have CUDA but I don’t know how to make it run without it. The issue is: File
“:\Users\Jacob\Downloads\stable-diffusion-webui\launch.py”, line 360, in
prepare_environment ()
File
“C: \Users\Jacob\Downloads\stable-diffusion-webui\launch.py”
line 272,
in prepare environment
run_python(“import torch; assert torch.cuda.is_available(),
“Torch is not able to use GPU;
add
–Sk
ip-torch-cuda-test to COMMANDLINE_ARG variable to disable this check’ “)
File
“C: \Users\Jacob\Downloads\stable-diffusion-webui\launch.py”, line 129, in run_python
return run(f “{python}”
-C
“{code}”
desc, errdesc)
File
“.:)Users\Jacob\Downloads \stable-diffusion-webui\Launch.py”, line 105, in run
raise RuntimeError(message)
RuntimeError: Error running command
Command:
“C: \Users\Jacob\Downloads\stable-diffusion-webui\venv\Scripts\python.exe”
-C
“import torch;
as
set torch.cuda.is_available(),
“Torch is not able to use GPU;
add
–§kip-torch-cuda-test to COMMANDLIN
E_ARGS variable to disable this
check””
Error code: 1
stdout:
stderr: Traceback (most recent call last):
File
“‹string>”
Line 1, in
AssertionError: Torch is not able to use GPU; add
-skip-torch-cuda-test to COMMANDLINE_ARGS variable
o disable this check
Hey Jacob, check out this guide for AMD.
Hey there,
I get the “Couldn’t install torch.” error.
I downloaded the newest version of Python (10.10. released on February 8) as you wrote. I run the “webui-user.bat” and I get the same error with a message that “A new release of pip available: 22.3.1 -> 23.0.1” and I should update it with a command.
I successfully update through command prompt and then I try again. The previous suggestion no longer appears, but the “Couldn’t install torch” error still stops the download.
Then I delete the “venv” folder and try again. The suggestion to update reappears with the “Couldn’t install torch” error.
It’s weird how the download sometimes goes on for a while, getting to 0,5-1,4 Gbs and then the error pops up again.
May I ask for your help with this?
Thank you in advance
Hey Sil, try the following:
– uninstall and reinstall Python, but this time try Python 3.10.6
– Restart computer and run again
after running webui-user (on windows 11) i get this:venv “C:\Users\nekom\Documents\stable-diffusion-webui\venv\Scripts\Python.exe”
Python 3.10.6 (tags/v3.10.6:9c7b4bd, Aug 1 2022, 21:53:49) [MSC v.1932 64 bit (AMD64)]
Commit hash: 0cc0ee1bcb4c24a8c9715f66cede06601bfc00c8
Installing requirements for Web UI
Launching Web UI with arguments: –lowvram
No module ‘xformers’. Proceeding without it.
Loading weights [67a115286b] from C:\Users\nekom\Documents\stable-diffusion-webui\models\Stable-diffusion\Anything-V3.0.ckpt
Creating model from config: C:\Users\nekom\Documents\stable-diffusion-webui\configs\v1-inference.yaml
LatentDiffusion: Running in eps-prediction mode
DiffusionWrapper has 859.52 M params.
Failed to create model quickly; will retry using slow method.
LatentDiffusion: Running in eps-prediction mode
DiffusionWrapper has 859.52 M params.
loading stable diffusion model: RuntimeError
Traceback (most recent call last):
File “C:\Users\nekom\Documents\stable-diffusion-webui\webui.py”, line 111, in initialize
modules.sd_models.load_model()
File “C:\Users\nekom\Documents\stable-diffusion-webui\modules\sd_models.py”, line 406, in load_model
sd_model = instantiate_from_config(sd_config.model)
File “C:\Users\nekom\Documents\stable-diffusion-webui\repositories\stable-diffusion-stability-ai\ldm\util.py”, line 79, in instantiate_from_config
return get_obj_from_str(config[“target”])(**config.get(“params”, dict()))
File “C:\Users\nekom\Documents\stable-diffusion-webui\repositories\stable-diffusion-stability-ai\ldm\models\diffusion\ddpm.py”, line 562, in __init__
self.instantiate_first_stage(first_stage_config)
File “C:\Users\nekom\Documents\stable-diffusion-webui\repositories\stable-diffusion-stability-ai\ldm\models\diffusion\ddpm.py”, line 614, in instantiate_first_stage
model = instantiate_from_config(config)
File “C:\Users\nekom\Documents\stable-diffusion-webui\repositories\stable-diffusion-stability-ai\ldm\util.py”, line 79, in instantiate_from_config
return get_obj_from_str(config[“target”])(**config.get(“params”, dict()))
File “C:\Users\nekom\Documents\stable-diffusion-webui\repositories\stable-diffusion-stability-ai\ldm\models\autoencoder.py”, line 30, in __init__
self.decoder = Decoder(**ddconfig)
File “C:\Users\nekom\Documents\stable-diffusion-webui\repositories\stable-diffusion-stability-ai\ldm\modules\diffusionmodules\model.py”, line 596, in __init__
block.append(ResnetBlock(in_channels=block_in,
File “C:\Users\nekom\Documents\stable-diffusion-webui\repositories\stable-diffusion-stability-ai\ldm\modules\diffusionmodules\model.py”, line 110, in __init__
self.conv2 = torch.nn.Conv2d(out_channels,
File “C:\Users\nekom\Documents\stable-diffusion-webui\venv\lib\site-packages\torch\nn\modules\conv.py”, line 450, in __init__
super(Conv2d, self).__init__(
File “C:\Users\nekom\Documents\stable-diffusion-webui\venv\lib\site-packages\torch\nn\modules\conv.py”, line 137, in __init__
self.weight = Parameter(torch.empty(
RuntimeError: [enforce fail at ..\c10\core\impl\alloc_cpu.cpp:72] data. DefaultCPUAllocator: not enough memory: you tried to allocate 9437184 bytes.
Stable diffusion model failed to load, exiting
Press any key to continue . . .
WIth a different amount of bytes everytime, what should I do?
Hey! try this:
Step 1: Edit webui-user.bat
Step 2: After COMMANDLINE_ARGS= , enter the following:
If you have 4GB-6GB VRAM
use
--medvram.If you have 2GB VRAM,
use
--lowvramIf you continue getting ‘Out of memory’ errors on either of these, add
--always-batch-cond-uncondafter the first part