AnimateDiff is one of the best ways to generate AI videos right now.
I've been making tons of AnimateDiff videos recently and they crush the main commercial alternatives: RunwayML and PikaLabs.
Here's the official AnimateDiff research paper. At a high level, you download motion modeling modules which you use alongside existing text-to-image Stable Diffusion.
While AnimateDiff started off only adding very limited motion to images, it's capabilities have growth rapidly thanks to the efforts of passionate developers.
This guide will cover using AnimateDiff with AUTOMATIC1111. I've covered using AnimateDiff with ComfyUI in a separate guide.
Personally I prefer using ComfyUI because I get a bit more configurability, but the AUTOMATIC1111 setup is much easier.
Requirements
You'll need a computer with an NVIDIA GPU running Windows.
10GB VRAM is required if you're doing video-to-video generation.
8 GB VRAM will suffice if you're doing text-to-video generation.
Setup
Install/Update AUTOMATIC1111
If you haven't already installed AUTOMATIC1111's Stable Diffusion WebUI, here are the installation instructions:
AnimateDiff will only work with AUTOMATIC1111 v1.6.0 or later. You can check your version by scrolling to the bottom of the WebUI:

Update your AUTOMATIC1111 if you have a version earlier than v1.6.0.
Download Motion Modules
You'll need to download the motion modules that are responsible for the animation.
I recommend you download these the following:
- V1.5 v2 by AnimateDiff team
- TemporalKit by Ciara Rowles
Place your motion modules into the folder stable-diffusion-webui/extensions/sd-webui-animatediff/model/
Download Checkpoint Models
Checkpoint models are responsible for generating the actual images in the video sequence.
You can use any model based on Stable Diffusion v1.5. SDXL are not supported yet.
If you don't have a model in mind, I recommend these models:
- DarkSushiMix for anime generation
- Epic Realism Natural Sin for realistic generation
Place checkpoint models into the folder stable-diffusion-webui/models/Stable-diffusion.
Install AnimateDiff Extension
Go to the Extensions tab and the Install from URL subtab.
Copy and paste the following URL into the field labled "URL for extension's git repository", then press the big Install button.
http://github.com/continue-revolution/sd-webui-animatediff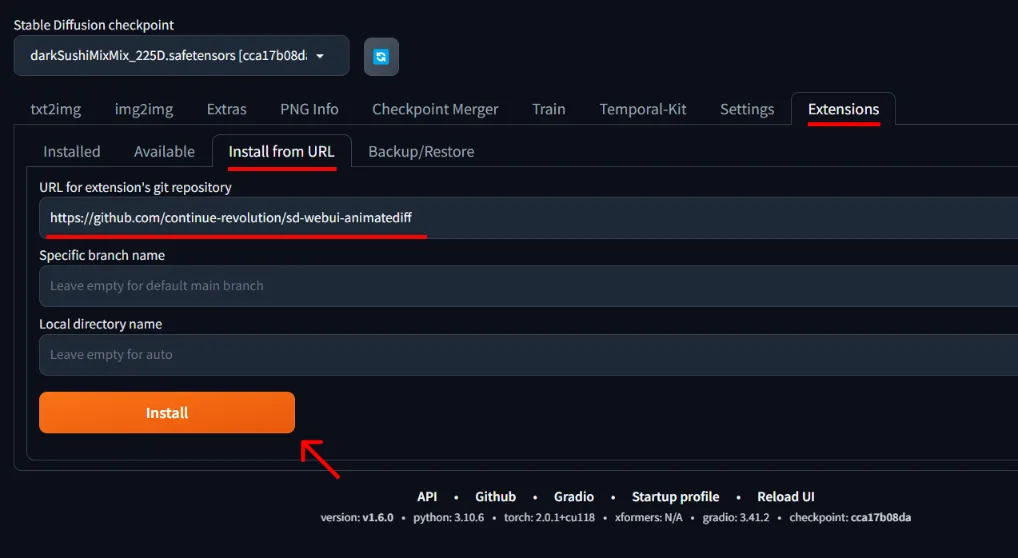
The WebUI will install the extension. To refresh, go the the Installed subtab (still in the Extensions tab) and click the big button "Apply and restart UI".

text-to-video: Generating videos from prompts
Now that you have the AnimateDiff extension installed, go to the txt2img tab.
Prompting
Write your prompt and set your settings as usual, if you were doing a regular image generation.
It's important to keep your prompt under 75 tokens and your negative prompt under 150 tokens, or else the resulting video will be split into multiple sequences.
I've noticed that natural phenomenon in your prompt like falling leaves, snow, waves, wind will animate particularly well.
As an example, I will use the following prompt and settings.
masterpiece, best quality, 1girl, (colorful),(delicate eyes and face), volumatic light, solo,smile,intricate skirt,((flying petal)),(Flowery meadow) sky, moonlight, light, fantasy, windy, magic sparks
Negative prompt: paintings, sketches, fingers, (worst quality:2), (low quality:2), (normal quality:2), lowres, normal quality, ((monochrome)), ((grayscale)), skin spots, acnes, skin blemishes, age spot, (outdoor:1.6), backlight,(ugly:1.331), (duplicate:1.331), (morbid:1.21), (mutilated:1.21), (tranny:1.331), mutated hands, (poorly drawn hands:1.5), blurry, (bad anatomy:1.21), (bad proportions:1.331), extra limbs, (disfigured:1.331), lowers, bad hands, missing fingers, extra digit
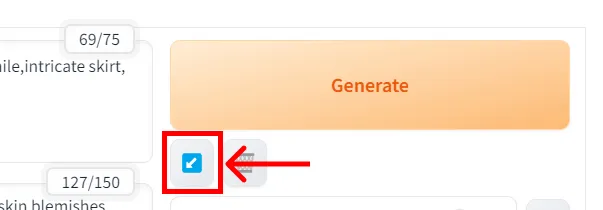
Steps: 20, Sampler: DPM++ 2M Karras, CFG scale: 7, Seed: 2025691187, Size: 512x768, Model hash: cca17b08da, Model: darkSushiMixMix_225D, Version: v1.6.0(if you want to use these settings, you can copy and paste them into your Prompt field, then click the downwards blue arrow underneath the Generate button. AUTOMATIC1111 will fill your settings in automatically)
Scroll down and you'll see there is now an AnimateDiff box in your settings (located under the seed setting).
Here are the settings I recommend:
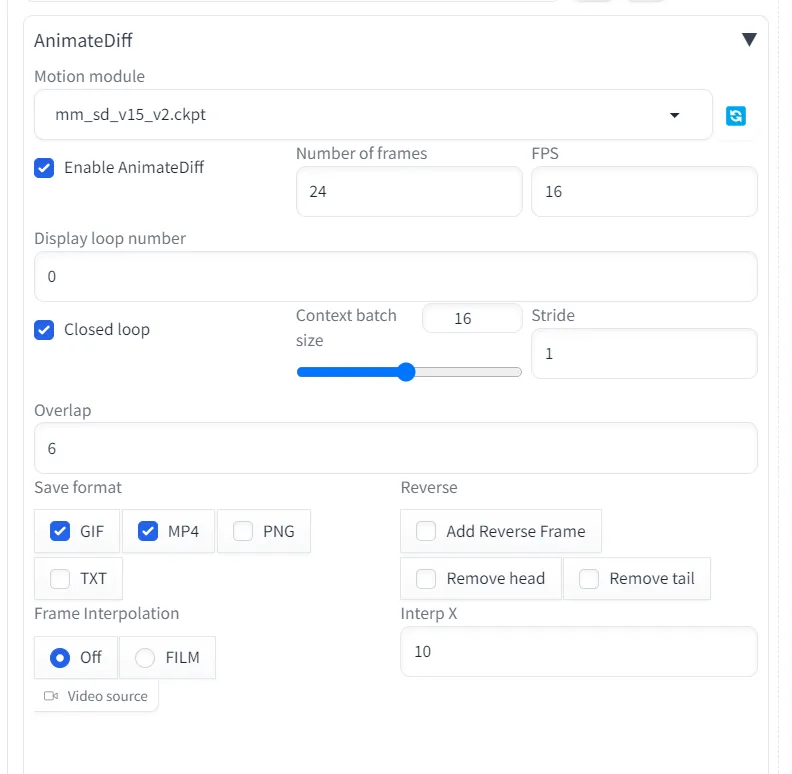
Let's walk through each of these one by one.
Motion module
Reponsible for the actual motion. Different modules will produce different results. You should have downloaded these and placed them in the folder stable-diffusion-webui/extensions/sd-webui-animatediff/model/
Recommendation: I prefer V1.5 v2. TemporalKit produces a slightly different result, you can experiment with both.
Enable AnimateDiff
You must check this to use AnimateDiff.
Number of frames
This will determine the animation length. This is up to you.
Recommendation: You will get better results will shorter videos. Try 16-24 frames.
FPS
Frames per second. Standard videos are shot at 24 fps.
If you submit a source video, your FPS will be the same as the source video.
Recommendation: 16-24 FPS will create a smoother video. If you don't care about this the default of 8 works fine.
Diplay loop number
How many times you want the video preview to loop. The default of 0 means loop forever.
This doesn't do anything to the video file, it only changes the video preview.
Recommendation: Leave at 0.
Closed loop [checkbox]
This will attempt to make the last frame the same as the first frame, allowing your video to run on an infinite loop.
Recommendation: Leave it unchecked unless you want the infinite loop animation.
Context batch size
How many frames will be passed into the motion module at once.
Recommendation: The documentation recommends choosing 24 for V1 motion modules and 32 for V2 motion modules, but I usually keep this at the default of 16.
Stride
This is the max motion stride as a power of 2. A higher value means that frames will be more different than previous frames.
Default is 1.
Recommendation: Leave at 1. Going higher creates jittery results.
Overlap
Number of frames to overlap in context. If overlap is the default of -1, your overlap will be Context batch size divided by 4
Recommendation: Set at 4-6 to create smoother results.
Save format
Format of the output. Choose at least one of "GIF"|"MP4"|"PNG".
Check "TXT" if you want infotext, which will live in the same directory as the output GIF.
Recommendation: I like to save both GIF and MP4, because these are better for sharing in different contexts. Only save PNG if you want the individual frames.
Reverse [Add Reverse Frame/Remove Head/Remove Tail]
Imagine that you are generating 4 frames: [1, 2, 3, 4].
Choosing Add Reverse Frame will result in the sequence: [1, 2, 3, 4, 4, 3, 2, 1].
Choosing Remove Head gives you [1, 2, 3, 4, 4, 3, 2]
Choosing Remove Tail gives you [1, 2, 3, 4, 3, 2, 1]
Recommendation: Unchecked unless you want the effect. If you do want the effect, I recommend also checking Remove Head and Remove Tail to create a much smoother repeating animation.
Frame Interpolation [OFF/FILM]
FILM (Frame Interpolation for Large Motion) is a neural network technique that takes similar images and makes it look like they're a film. Checking FILM will apply this technique to your animation.
Recommendation: You can try this, but I've found the impact to be small.
Interp X
This will only apply if Frame Interpolation is on (if FILM is selected). Replaces each input frame with X interpolated output frames.
Recommendation: Leave at 10 frames.
Video source / Video path
You can upload a video or write the path to the video if you want to do AnimateDiff video-to-video.
video-to-video
When you upload a video, the FPS and total number of frames in the existing video will be used as your AnimateDiff settings.
Longer videos will take quite a while to generate. You can reduce this time by trimming the video with website like online-video-cutter.com or free software like Capcut (available for desktop & mobile). You can also reduce the resolution of your videos.