AnimateDiff is an open source technology released in July 2023 [Github][research paper]; it's one of the best ways to generate AI videos right now.
This guide will cover using AnimateDiff with ComfyUI. You can check here for the ComfyUI installation guide.
In this guide I will share 4 ComfyUI workflow files and how to use them. These 4 workflows are:
- Text2vid: Generate video from text prompt
- Vid2vid (with ControlNets): Generate video from existing video
Here are all of the different ways you can run AnimateDiff right now:
- with ComfyUI (ComfyUI-AnimateDiff) (this guide): my prefered method because you can use ControlNets for video-to-video generation and Prompt Scheduling to change prompt throughout the video.
- with AUTOMATIC1111 (SD-WebUI-AnimateDiff) [Guide][Github]: this is an extension that lets you use ComfyUI with AUTOMATIC1111, the most popular WebUI. It's the easiest to get started because you only need to download the extension.
- with animatediff-cli-prompt-travel: this software lets you change the prompt throughout the video. There is no user interface yet, you have to run this through the Command Prompt.
Requirements
You'll need a computer with an NVIDIA GPU running Windows.
10GB VRAM is required if you're doing video-to-video generation.
8GB VRAM will suffice if you're doing text-to-video generation.
Setup
Install/Update ComfyUI
If you haven't already installed ComfyUI, follow the installation instructions:
Install Custom Nodes
In your Command Prompt copy and paste the following commands (you will need Git, which you should already have installed when you were installing ComfyUI).
- git clone http://github.com/Kosinkadink/ComfyUI-AnimateDiff-Evolved
- git clone http://github.com/ltdrdata/ComfyUI-Manager
- git clone http://github.com/Kosinkadink/ComfyUI-Advanced-ControlNet
- git clone http://github.com/Kosinkadink/ComfyUI-VideoHelperSuite
Now, start ComfyUI by clicking run_nvidia_gpu.bat.
Then click on the Manager button then "install custom nodes"
- Search for "Auxiliary Preprocessors" and install the node ComfyUI's ControlNet Auxiliary Preprocessors.
- Search for "FizzNodes" and install the node Fizznodes.
Download Motion Modules
You'll need to download the motion modules that are responsible for the animation.
I recommend you download these the following:
- V1.5 v2 by AnimateDiff team
- TemporalKit by Ciara Rowles
Place your motion modules into the folder ComfyUI/custom_nodes/ComfyUI-AniamteDiff-Evolved/models.
Download Checkpoint Models
Checkpoint models are responsible for generating the actual images in the video sequence.
For this workflow, you can use any model based on Stable Diffusion v1.5. SDXL models can be run using Hotpot XL.
If you don't have a model in mind, I recommend these models:
- DarkSushiMix for anime generation
- Epic Realism Natural Sin for realistic generation
Place checkpoint models into the folder ComfyUI/models/checkpoints.
Download VAE
Download this VAE:
Place it in the folder ComfyUI/models/VAE.
Download ControlNets
Download these ControlNets:
Place ControlNet files into the folder ComfyUI/models/controlnets.
Generating Videos (vid2vid)
Finding videos
If you don't have a video in mind, you can use pexels.com to download free stock videos, or snaptik.app to download videos from TikTok.
Workflow
Download the following workflow file:
Drag and drop the workflow into the ComfyUI interface to get started. If you have missing (red) nodes, click on the Manager and then click Install Missing Custom Nodes to install them one-by-one. If the nodes are already installed but still appear red, you may have to update them: you can do this by Uninstalling and Reinstalling them.
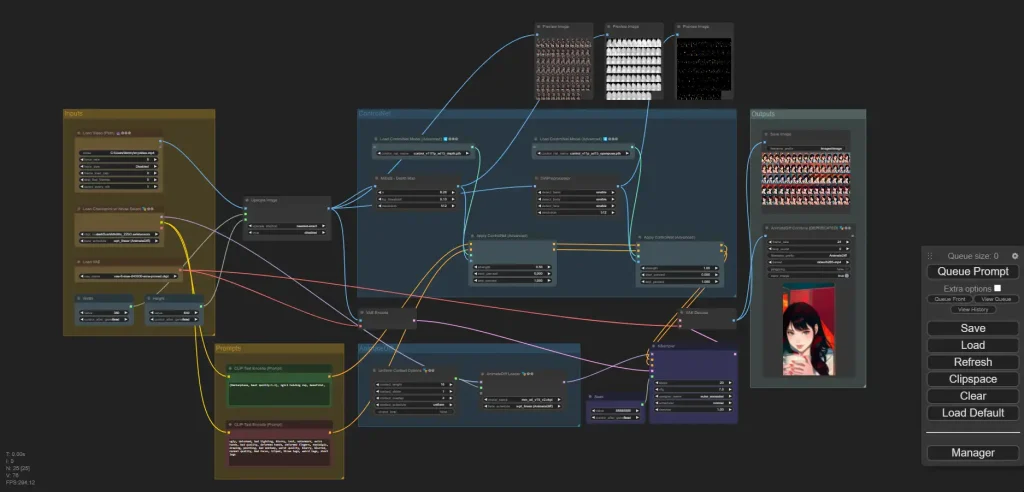
Let's go through each of the sections!
Inputs

This section is for loading models and includes width/height settings.
- Load video (Path)
- video: The path of the video. Go to your video file in the file explorer, right click, select "Copy as path", and then paste the full path into this field. Make sure you remove any quotation marks.
- force_rate: this selects how many frames per second of the original video you use. Keep in mind this is different from the FPS of the final video, which you set in the Output section later on. So if your original video is 16 FPS, but you set
force_rateat 8, the generated video will only take half of the frames of the original video. - select_every_nth: This is applied after force_rate to further cut down on frames used.
- Load Checkpoint w/ Noise Select
- Select the checkpoint model
- Load VAE
- Select the VAE you downloaded
- Width/Height
- These do not have to be the exact dimensions of your input video, but the aspect ratio must be the same. For example, I'm using a 1920x1080 input video (16:9 aspect ratio), but using 640x360 (16:9 aspect ratio) for my generations because it's much faster.
Prompts
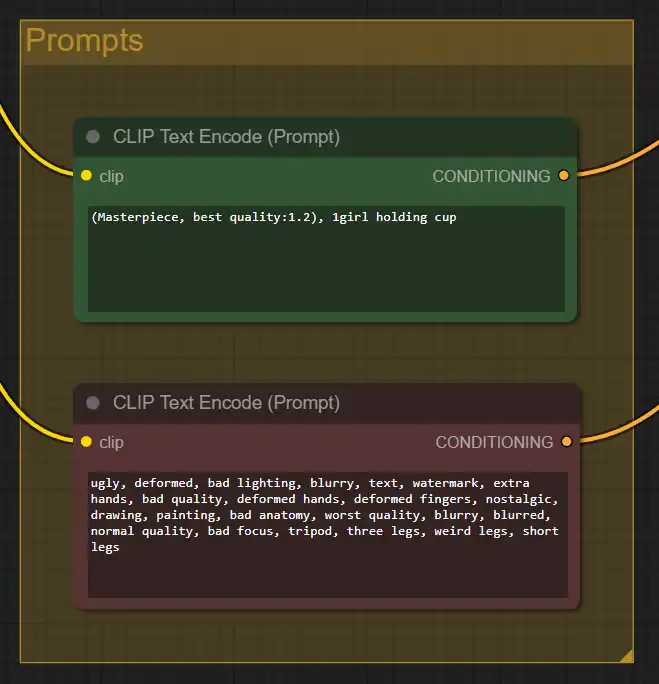
This is regular old Stable Diffusion prompting.
In your prompt describe what you want. You can describe aspects of the original video you want to keep, or try changing it up completely, only keeping the movement of the original subject.
ControlNet
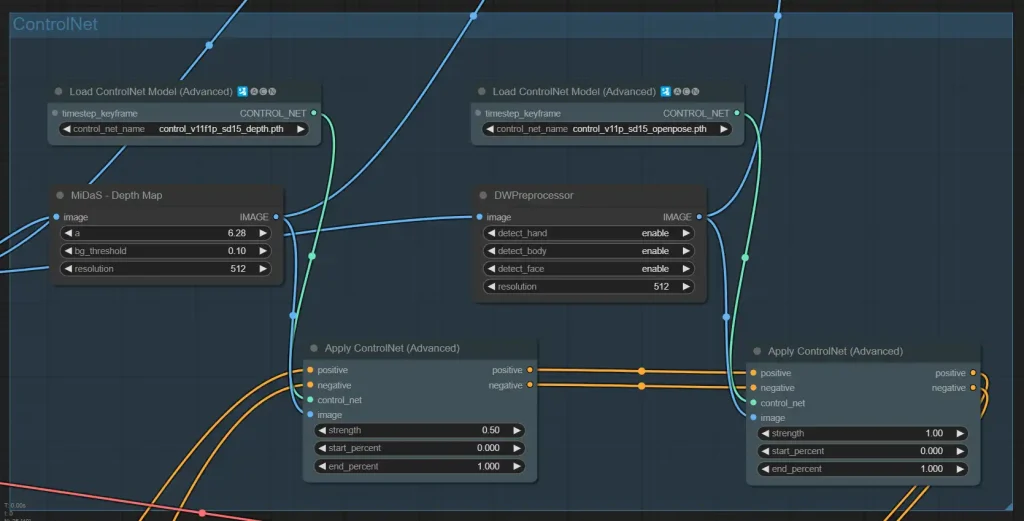
Select the ControlNets you downloaded in the "Load ControlNet Model (Advanced)" nodes.
AnimateDiff
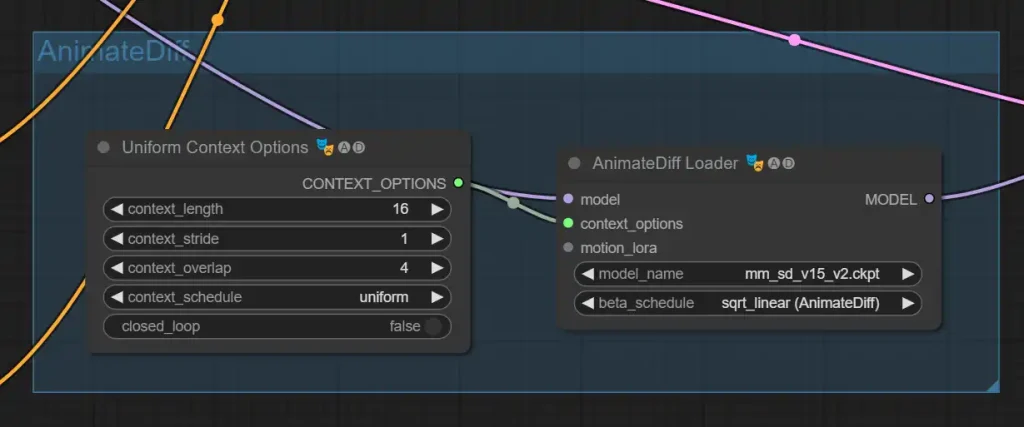
Select the motion model you downloaded in the AnimateDiffLoader node.
The node Uniform Context Options contains the main AnimateDiff options. The defaults will work fine:
- context_length: How many frames are loaded into a single run of AnimateDiff. 16 works the best.
- context_overlap: How many frames are overlapped between runs of AnimateDiff for consistency. The default setting of 4 means that frames 1-16 are processed together, then frames 12-28 are processed together.
- closed_loop: AnimateDiff will try to make your video an infinite loop. Does not work for vid2vid.
- context_stride: At 1 this is off. In theory, this make your videos more consistent by having AnimateDiff process select frames throughout the entire video, and then fill in the intermediary frames. However in practice, it makes the video jittery and inconsistent. Recommend leaving this at 1.
KSampler
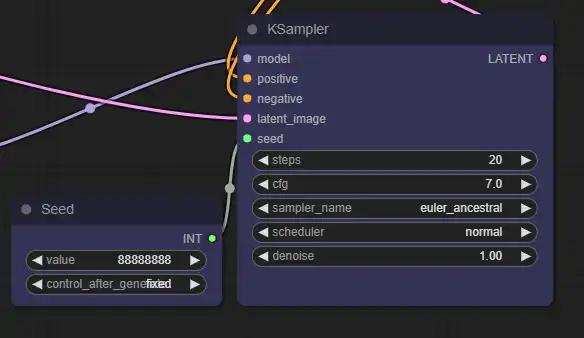
There are regular old Stable Diffusion settings.
- steps: I recommend 20-30 steps with Euler sampler, or 30-40 steps with other samplers.
- cfg: How strictly the generation adheres to the prompt. The default of 7 is fine.
- sampler_name: I recommend Euler a or DPM++ 2M.
- denoise: 1 is the strongest. If you lower this, the result will look more like your original video.
Outputs

- frame_rate: frame rate of the output video
- loop_count: number of loops to do before stopping. 0 is infinite looping.
- format: you can change format from GIF/MP4/WEBM. For highest quality, choose video/h265-mp4
- pingpong: will make the video go through all the frames and then back instead of one way (boomerang effect)
- save_image: Saves a single frame of the video. ComfyUI-generated images contain metadata that let you drag and drop them into ComfyUI to bring up the exact workflow used to create them. Since the videos you generate do not contain this metadata, this is a way of saving and sharing your workflow.