This guide will cover training an SDXL LoRA.
It's meant to get you to a high-quality LoRA that you can use with SDXL models as fast as possible.
"Fast" is relative of course.
Gathering a high quality training dataset will take quite a bit of time.
The actual model training will also take time, but it's something you can have running in the background.
This guide uses Runpod. A very similar process can be applied to Google Colab (you must manually upload the SDXL model to Google Drive).
If you want to train on your own computer, a minimum of 12GB VRAM is highly recommended. Most of the process in this guide will apply to local training as well (make sure you have Kohya SS and AUTOMATIC1111 installed).
Runpod is a cloud GPU rental service. It comes with handy templates that users have created, that let us deploy the training tool Kohya SS + image generator AUTOMATIC1111 with one click.
You can train with as little as $2 (though this is the bare minimum, and not very practical. I recommend topping up with more, so you can experiment more and not feel rushed).
In this guide, I'll use pink to highlight important things that many people overlook.
Let's dive in!
Method Summary & Results
The problem with talking about LoRA training is that the answer to most questions is: "it depends".
Different settings work better with different datasets and hardware.
Everything in this guide pertains to this method, which is specific to face training:
- Since we're using Runpod, we have the freedom of choosing what GPUs we are working with. I recommend the RTX 3090/4090 with 24GB VRAM, or a datacenter GPU like the A100 with 80GB VRAM. Higher performance GPUs will train faster but be more expensive.
- We'll use 50-100 training images focused on face.
- We'll caption our images with a tag style eg. "lisaxl, woman, brown shirt".
- Natural language caption style such as "lisaxl, a woman wearing a brown shirt" can be used but it is not optimal for this method.
- No regularization images are needed.
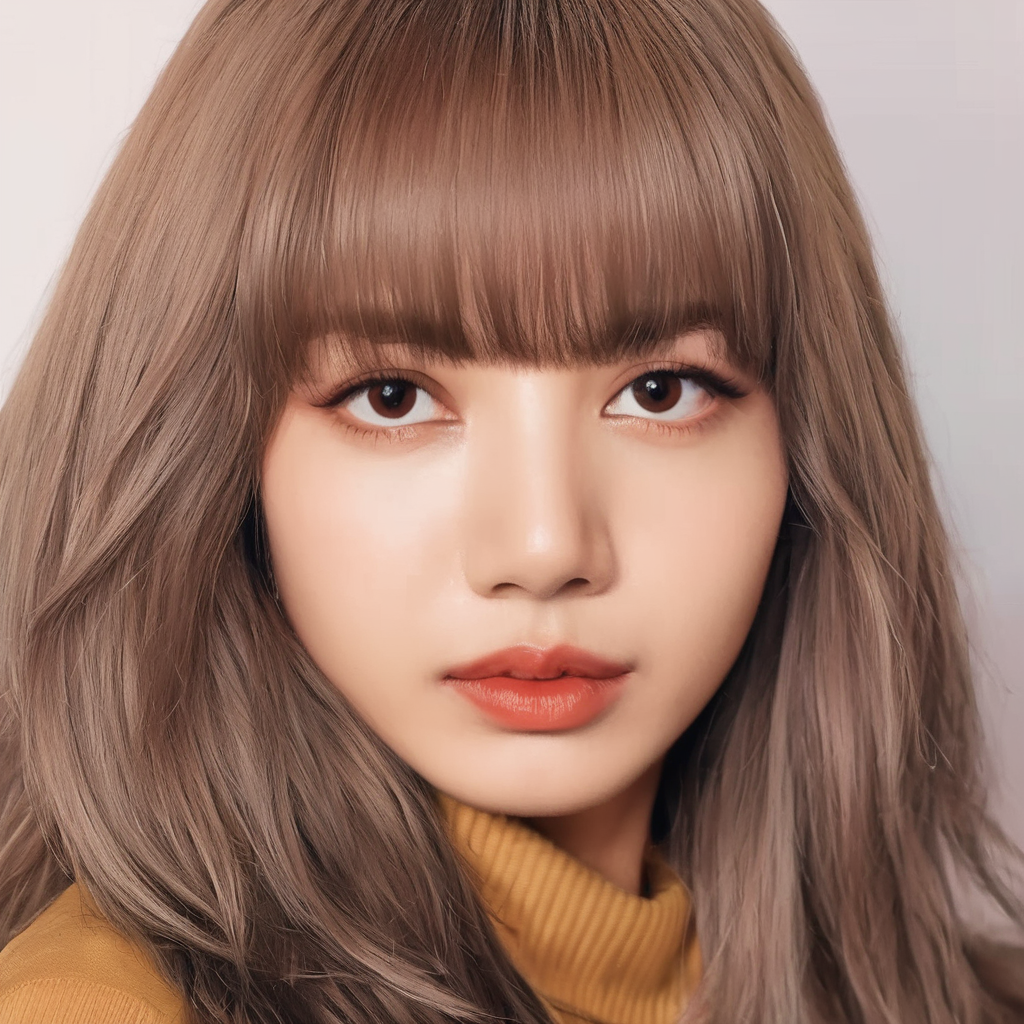
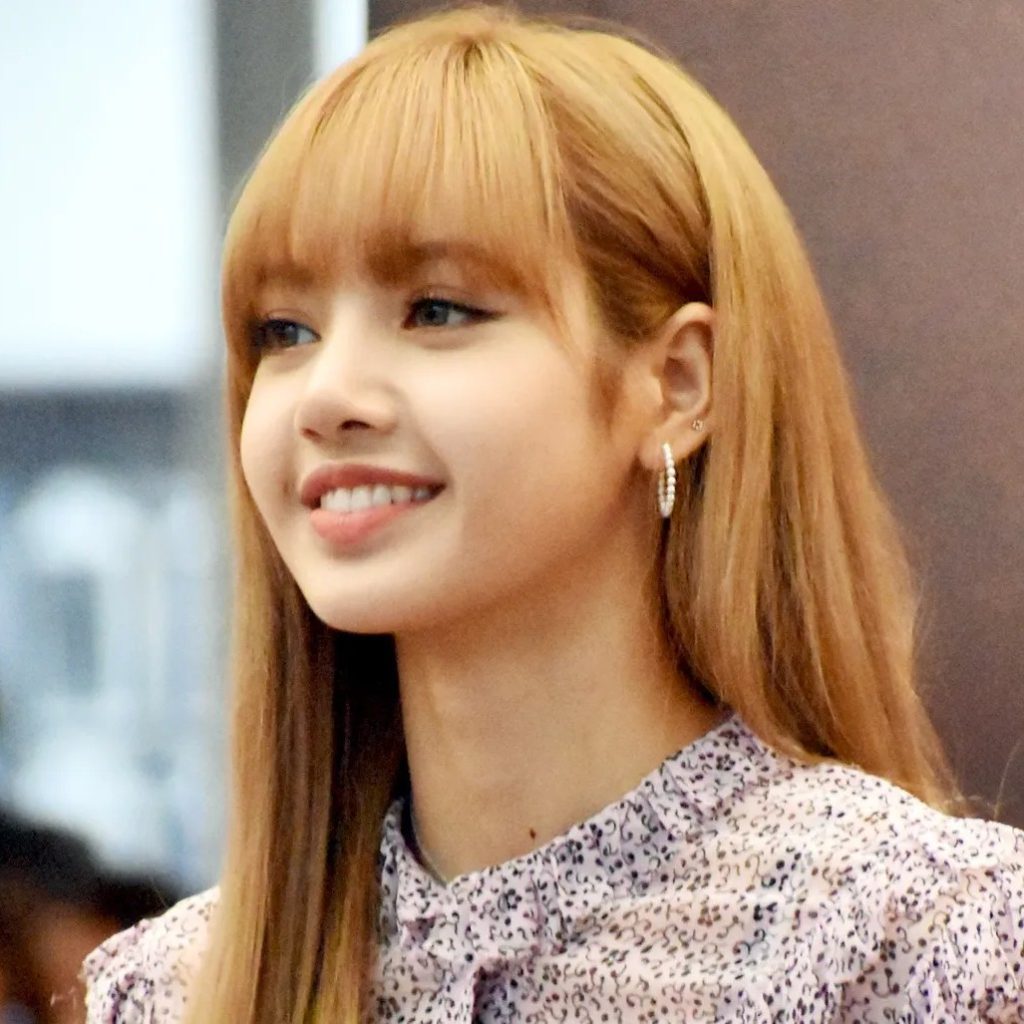
Here are some training images used in our example, of the K-pop artist Lisa:


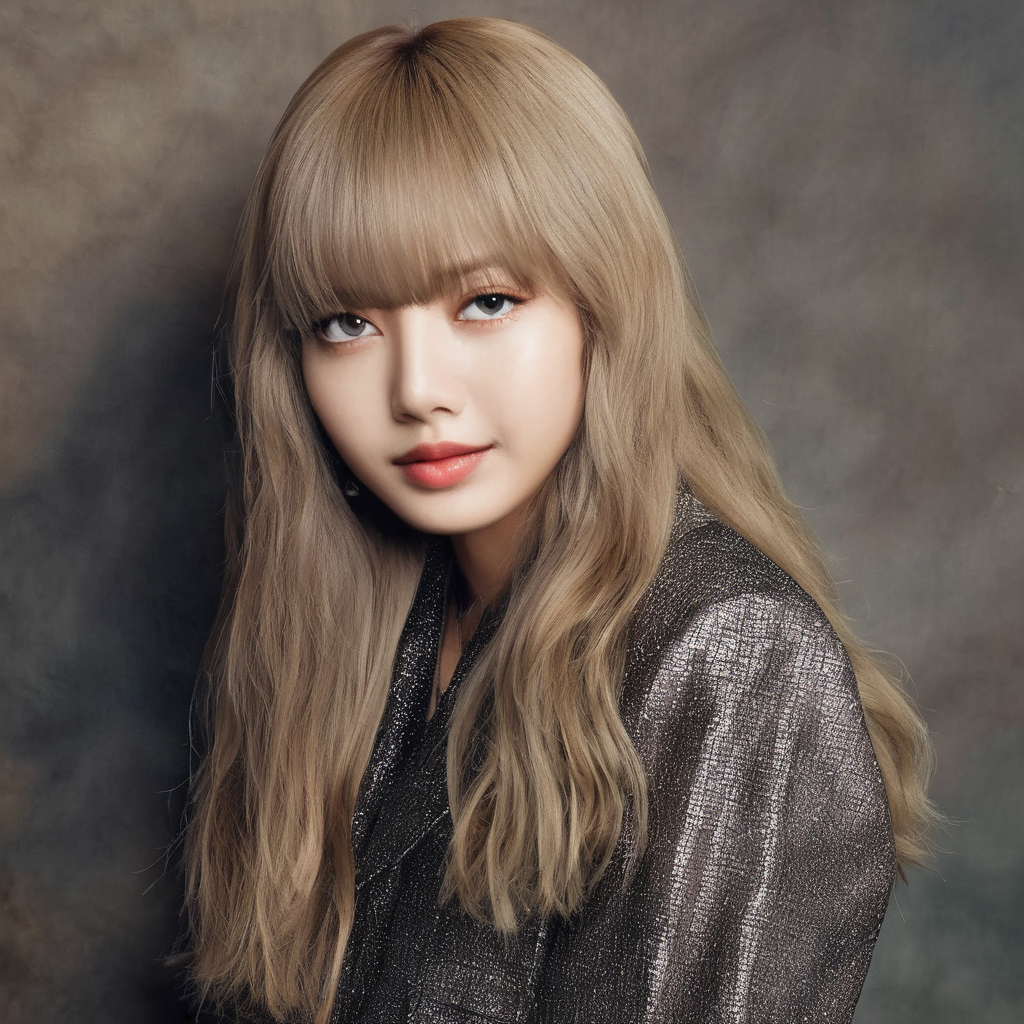
And here are some sample images generated with the LoRA:

Preparing Training Data
For this method, you'll want 50-100 training images of your subject.
I recommend all images are perfect 1:1 squares (You don't have to have 1:1 square images to train LoRAs, however this reduces our margin of error).
You can bulk crop images to squares with bulkimagecrop.com.
Images should be:
- Larger than 1024 x 1024. Since large images are harder to find, larger than 512 x 512 is ACCEPTABLE. Using too many images lower than that will ruin a SDXL LORA
- Be zoomed in on the face portrait-style, since we are creating a face LoRA
- Feature your subject in a variety of angles and lighting (nothing too out of the ordinary)
- JPEG/PNG/WEBP format
Avoid images where:
- The person is being partially covered by something else
- The style or pose are strange
- There are other people in the image (you don't even want faces or hands of other people near the borders of the image, because that will bias the model to put things on the image edge)
- Image is blurry (low resolution screenshots or photos)
Here are some examples of the images in our dataset:

Here are some photos that I considered but ultimately did not include, and the reasons why:


Place your images in the same folder.
Setting up Runpod
Sign Up
Go to Runpod and create an account.
Alternatives to Runpod?
You can also follow this tutorial with Google Colab, in which case you will be paying $10/mo for Pro membership.
Vast.ai is another cloud GPU provider. However, it doesn't have the template that we're going to use, which lets us start Kohya SS (for training) and AUTOMATIC1111 (for testing) with one click.
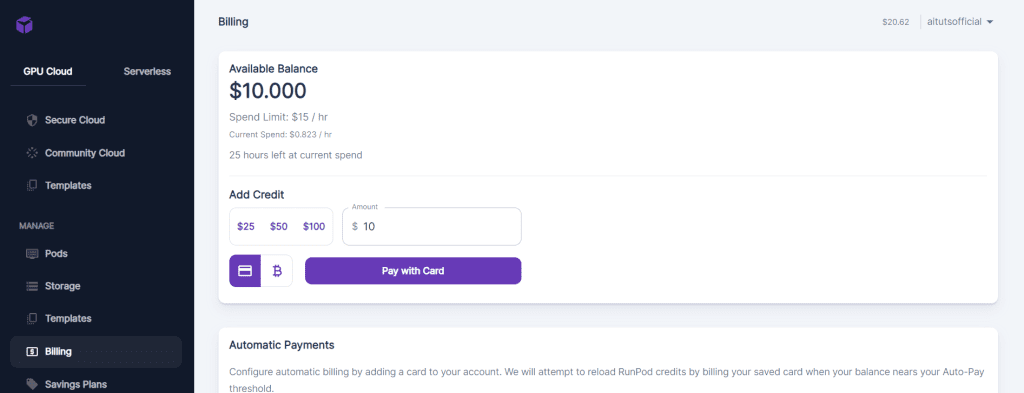
Go to the billing tab to buy hours. You'll be using GPUs that cost $0.40-$0.80/hour. $5-$15 will be enough to get started and complete this tutorial.
Start Pod
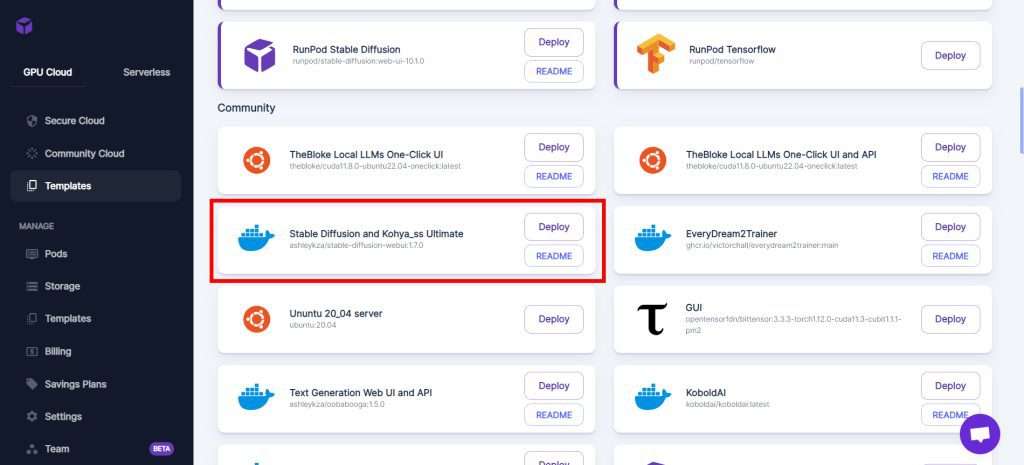
In the Templates tab, look for "Stable Diffusion Kohya_ss ComfyUI Ultimate" (previously named "Stable Diffusion and Kohya_ss Ultimate") in the Community section:
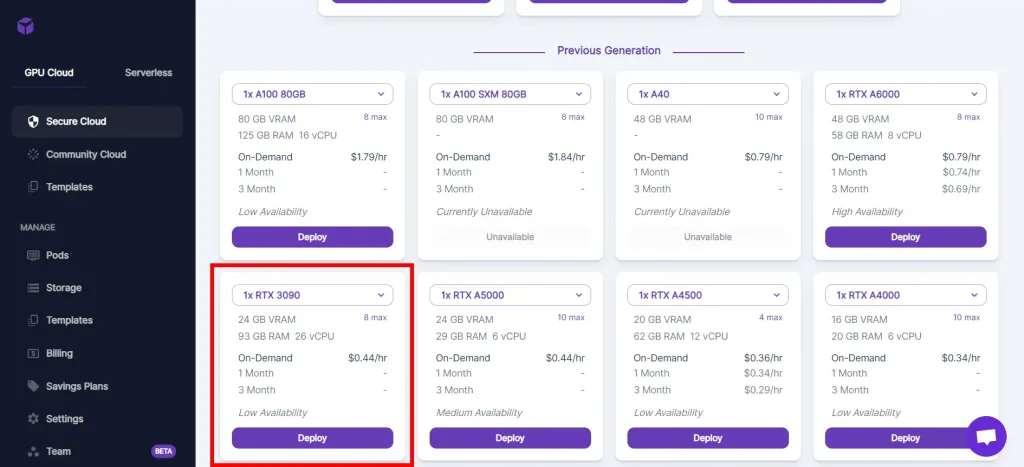
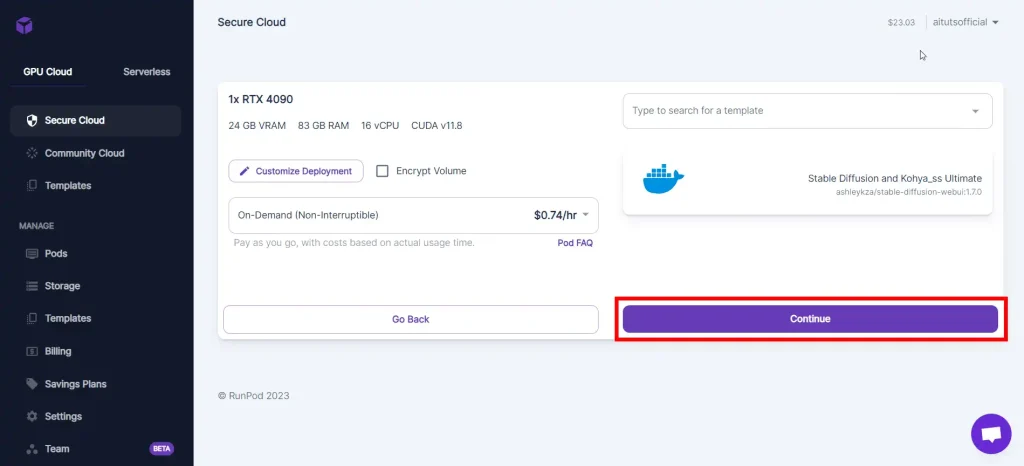
Select your GPU and click Deploy.
The RTX 3090 / RTX 4090 will give you a decent balance of speed / price.
If cost isn't a consideration, go with one of the A100s.
Click on Continue, and then Deploy.
It will take a while for the deployment to finish:

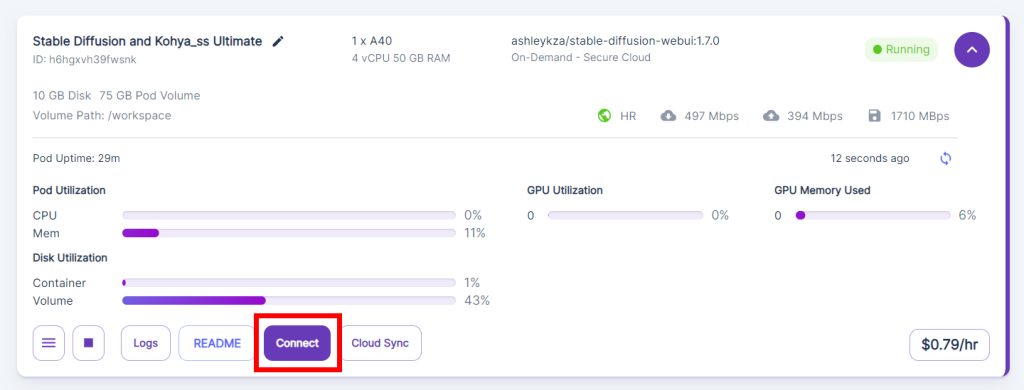
Pod is Running
When your Pod is running you will see the green Running badge in the corner.
Click on the Connect button.

These ports will allow you to access different tools and services. These are what these ports map to in the template we're using:
- [Port 3000] AUTOMATIC1111's Stable Diffusion Web UI (for generating images)
- [Port 3010] Kohya SS (for training)
- [Port 3010] ComfyUI (optional, for generating images. Check out the ComfyUI guide.)
- [Port 6006] Tensorboard (visualization tool, beyond the scope of this tutorial)
- [Port 8888] Jupyter Lab (for accessing the file system and terminals)
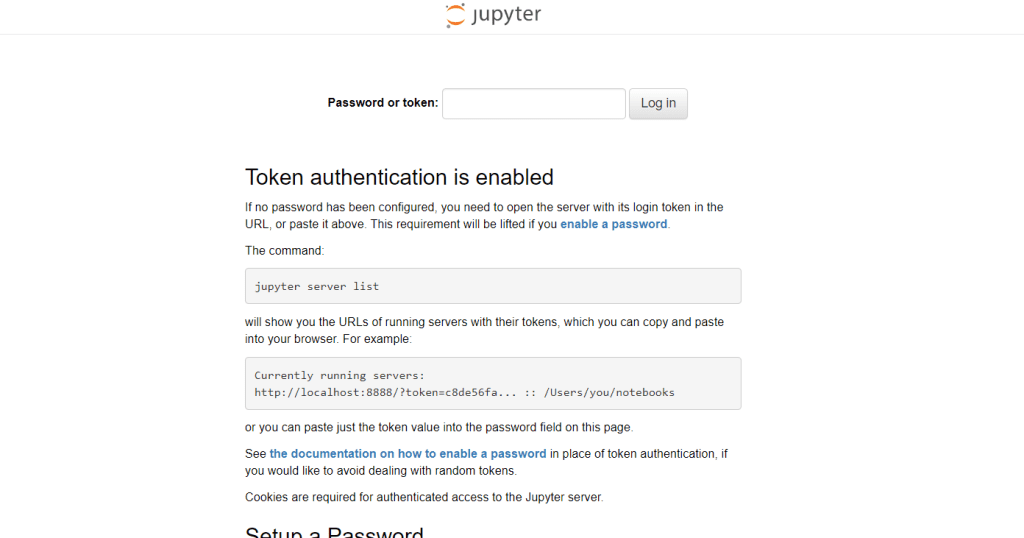
Click on Connect to HTTP Service [Port 8888] to open JupyterLab.
Use the default password to sign in: Jup1t3R!
This what you'll see. Click on Terminal.
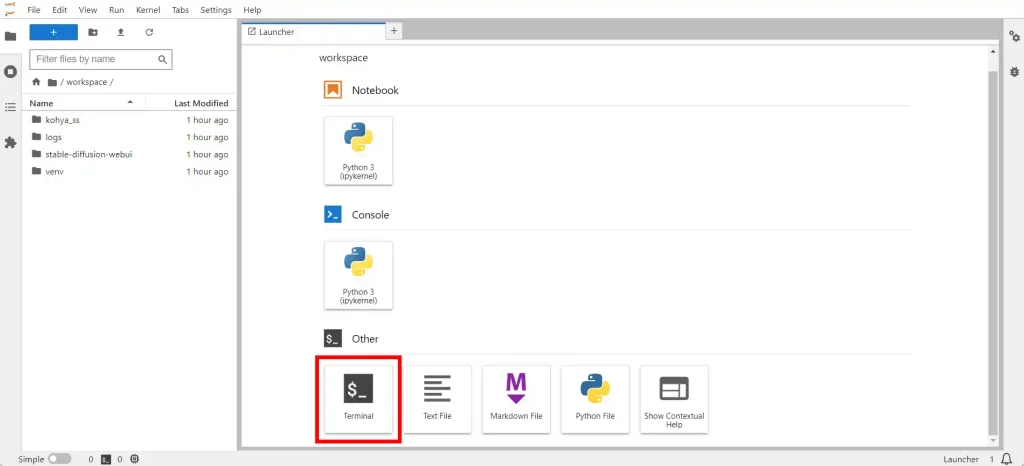
Check that you've already downloaded the SDXL models by navigating to the folder stable-diffusion-webui/models/Stable-diffusion in the left panel, which has a file explorer:

Upload Training Images
You will upload your training images directly into the JupyterLab workspace.
You can only upload files and not folders, so you'll have to create the folder structure in JupyterLab.
Create the following folders (Right click -> New folder):
- folder called
img- inside this, a subfolder called
1_<CLASS><CLASS>is the class of things your subject belongs to.
Pick one out of:man/woman/boy/girl
-> my example folder will be1_woman
- inside this, a subfolder called
Inside this 1_<CLASS> folder, drag and drop all of your training images.
Upload Configuration File
Download this configuration file:
Upload this to your JupyterLab workspace.
Print Kohya Log
We'll need a place to see our progress updates.
In JupyterLab, open a new Terminal. Enter the command:
tail -f /workspace/logs/kohya_ss.logNow this terminal will output the Koyha SS log, giving you progress updates.
Caption Training Images
Next step: you'll need captions for all your training images.
Our caption style will look like:
TRIGGER, CLASS, <anything that isn't present in all images>
TRIGGERis the word you'll use to trigger the subject in your generationsCLASSis the class of things it belongs to. Choose from: man/woman/boy/girl.- Then write things that are not present in all images, like "sitting down, red shirt, smile" etc.
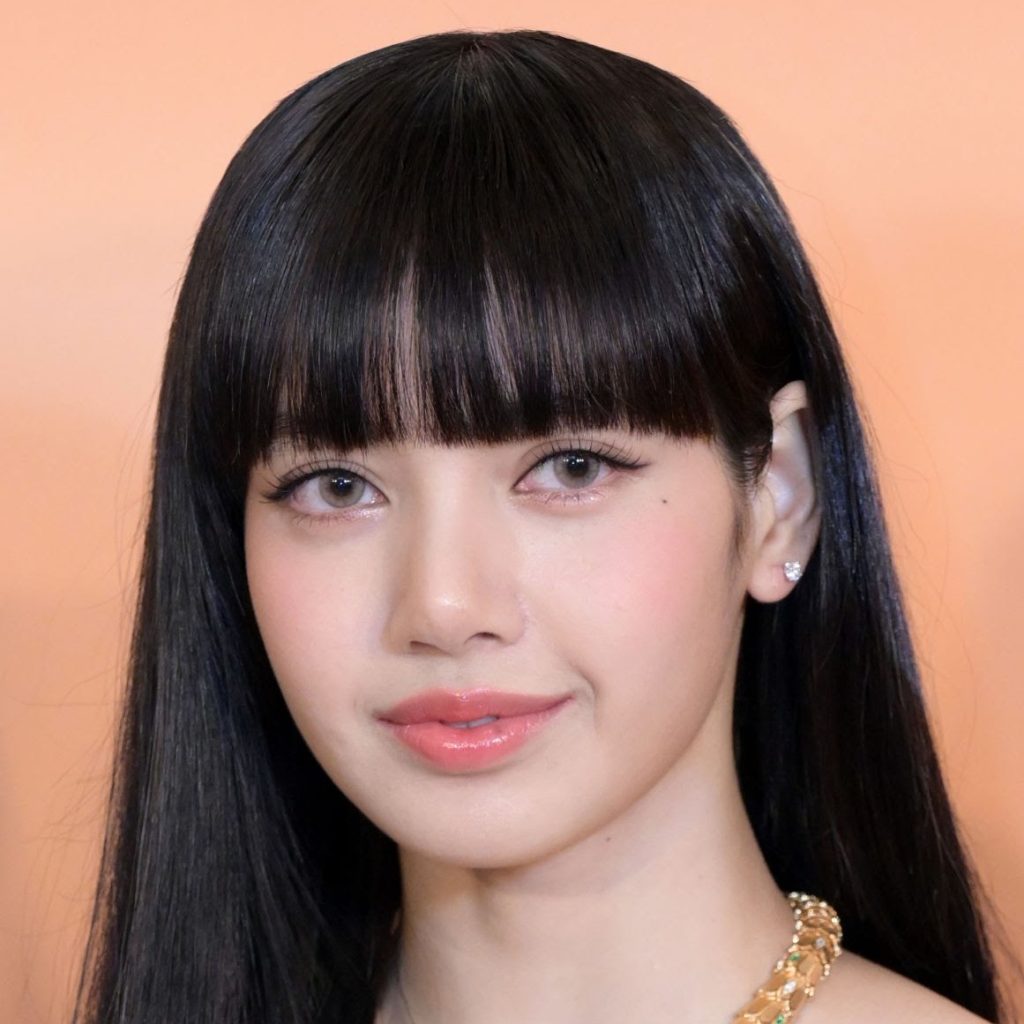
So for this image:

My caption would be:
lisaxl, girl, looking at viewer, sleeveless, black shirt, head tilt, jewelry, parted lips, gray background
You can do these captions manually, but we'll save time by using Kohya SS to generate captions, and then removing the unnecessary ones.
Go to Runpod, click Connect, and click Connect to HTTP Serve [Port 3010].

Kohya SS will open.
In the Kohya interface, go to the Utilities tab, Captioning subtab, then click WD14 Captioning subtab.
- In Image folder to caption, enter
/workspace/img. - In
Prefix to add to WD14 caption, write your TRIGGER followed by a comma and then your CLASS followed by a comma like so:"lisaxl, girl,"
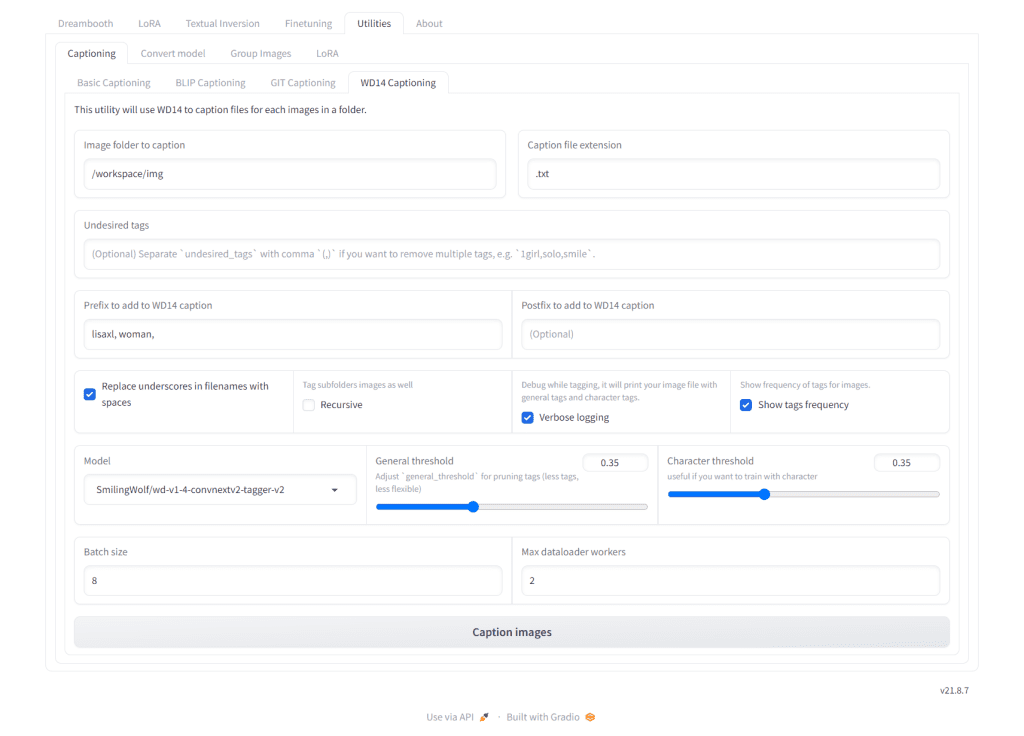
Click Caption images.
This will give you a first pass - you can check your JupyterLab Kohya terminal to see what tags you get that are common to the subject. In my example I remove all of these tags: "nose" "lips" "1girl".
Place these items in a comma-separated list in the Undesired tags field, like: "nose, lips, 1girl".
Then click Caption images again, and you will have a pruned set of captions.
Kohya SS Training
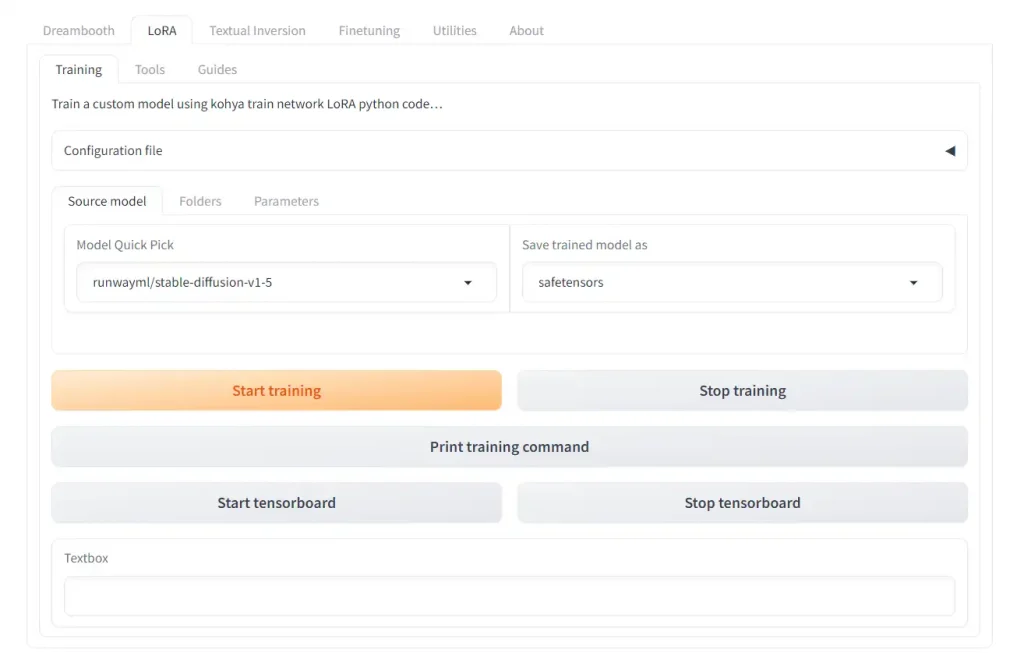
In the Kohya SS interface, click on the LoRA tab.
Make 100% sure you are in the LoRA tab, not the Dreambooth tab. This trips a lot of people up because the tabs look exactly the same.
Make the following changes:
Click on the Configuration file section to open it.
Copy the path of the configuration file from the JupyterLab workspace (be sure to add a slash to the front "/"). If you used the configuration file above this will be:
/workspace/kohya_facePreset_AdamW-fullbf16.json
Click on Load.

Then, make the following changes.
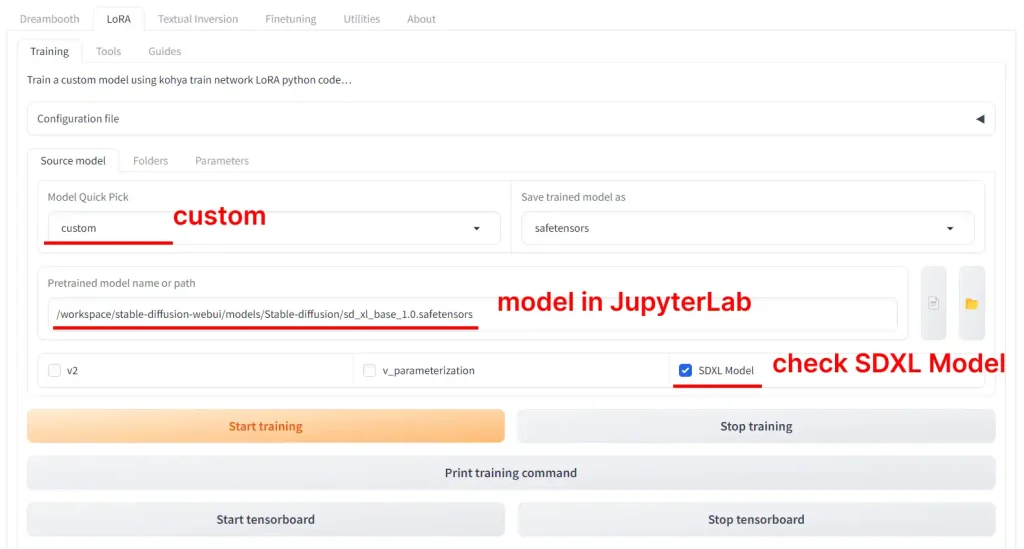
In the Source Model tab:
- in
Pretrained model model name or path, write:/workspace/stable-diffusion-webui/models/Stable-diffusion/sd_xl_base_1.0.safetensors
(this should be where your SDXL model downloaded to, check your JupyterLab workspace) - Make sure checkbox labeled
SDXL modelis checked
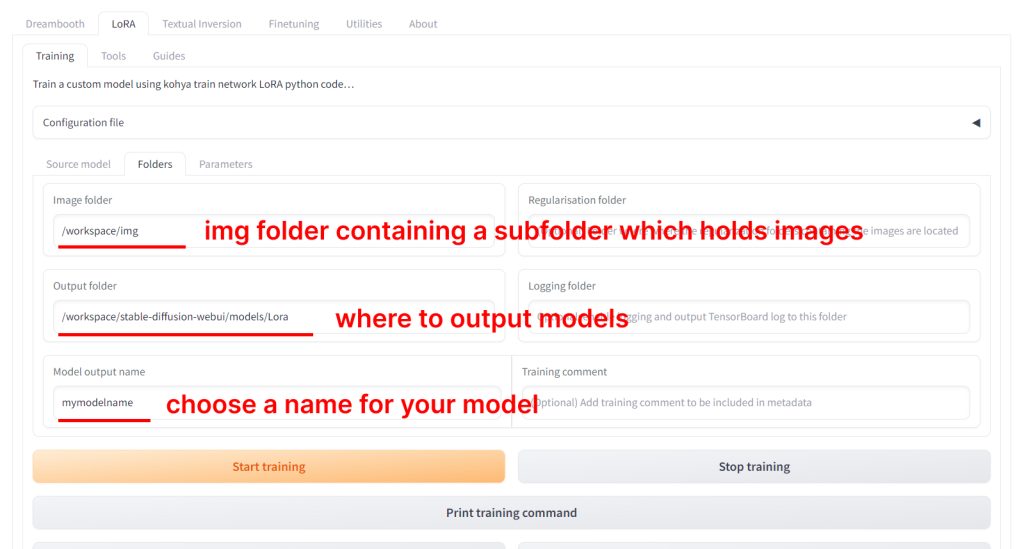
Then, go to the Folders tab:
- Change
Imagefolder to the path of theimgfolder you created in your JupyterLab workspace earlier. If you followed this guide, it should be:/workspace/img - Change
Outputfolder to:/workspace/stable-diffusion-webui/models/Lora - Change your
Model output nameto be whatever you want. To stay organized, you can end your mode name with the version such as: "lisaxl_v1"
Now, go to the Parameters tab.
The configuration file has set the recommended settings. Below I'll comment on these settings and why you might want to change them.
Train batch size: 5 -> The number of training images you have should be divisible by the batch size.
Epoch: 100 -> You should get a good result with the method around epoch 50-60. This configuration file outputs models every 5 epochs, which will let you test the model at different epochs. I've noticed it's much harder to overcook (overtrain) an SDXL model, so this value is set a bit higher. Feel free to lower it to 60 if you don't want to train so much.
Here's a full explanation of the Kohya LoRA training settings.
Click the big Start training button.
Check Training Log
You can check the progress of your training in your JupyterLab workspace terminal:
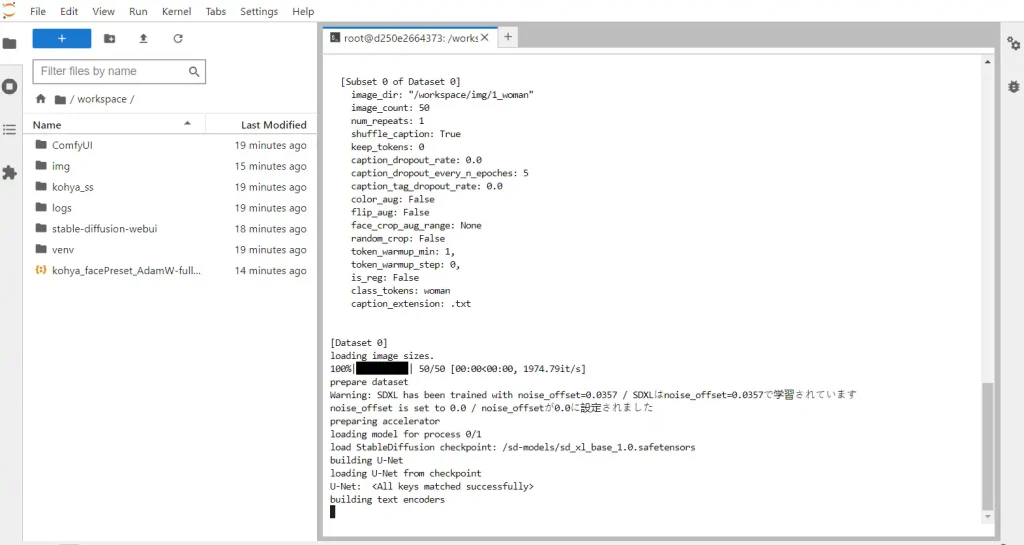
The progress bar will tell you what epoch and step your are on, time elasped, estimated time remaining, how many seconds per iteration (s/it) and loss.

Test your LoRA
Go back to Runpod, and click on Connect to HTTP Service [Port 3000] to open AUTOMATIC1111.
Make sure to adjust these settings before you prompt:
- Resolution: 1024 Width x 1024 Height
- Sampling steps: 30 or greater
- Sampling method: DPM++ 2M Karras (or any DPM++ sampler that uses Karras)
In the previous step, you set the LoRA output destination to be the AUTOMATIC1111 LoRA folder stable-diffusion-webui/models/lora. This means you will be able to use your LoRA with AUTOMATIC1111 straight away.
To use them:
Write the LoRA keyphrase in your prompt. It follows the format: <lora:LORA-FILENAME:WEIGHT>
LORA-FILENAME is the filename of the LoRA model, without the file extension (eg. no .safetensor).
WEIGHT is how strong you want the LoRA to be. The range is 0-1.
Then, include the TRIGGER you specified earlier when you were captioning your images in your prompt.
As an example:
<lora:lisaxl_v1:0.9> lisaxl portrait, masterpiece, breathtaking photograph, golden hour, outside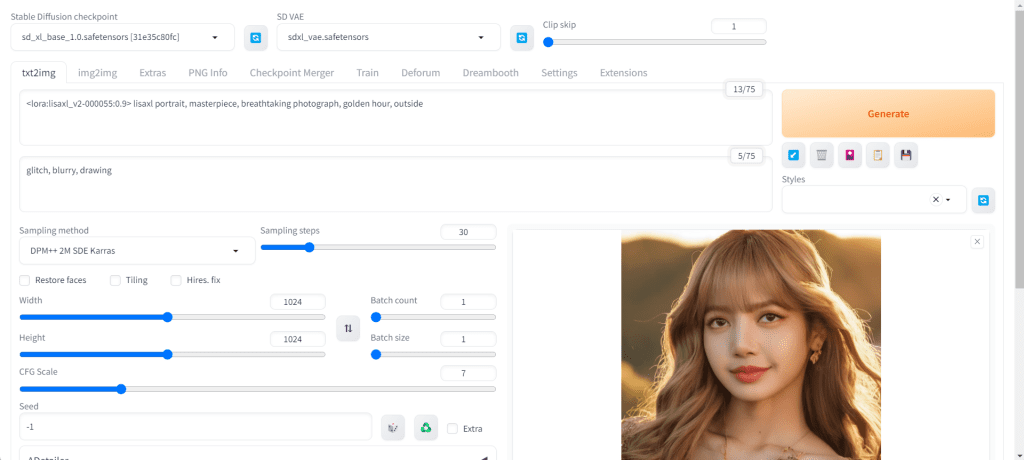
This is the result:

If you're satisfied with your LoRA, download the LoRA file from your JupyterLab workspace. It will be located in stable-diffusion-webui/models/lora.


in the steps above you say “Caption Training Images
Next step: use Kohya SS to generate captions for these images.” Where is that? You don’t say to connect to port 3010, the Kohya interface until the next step. So where is this Kohya SS? I tried connecting to port 3010 and following the steps, but the caption images buttons didn’t seem to do anything.
Also there is no exact match in RunPod for the template you describe. There is only the Comfy UI one.
Hey P Anaka, I have added clarification on opening Port 3010 in the captioning section.
Regarding the template: the author of the “Stable Diffusion and Kohya_ss Ultimate” template has updated it to be called ”
Stable Diffusion Kohya_ss ComfyUI Ultimate”
This part “You set the LoRA output destination to be the AUTOMATIC1111 LoRA folder stable-diffusion-webui/models/lora, so you can use them straight away.”
You do not say where or how to do this?
This refers to something you have already done in a previous step: in Kohya SS LoRA tab folder subtab step, you “Change Output folder to:
/workspace/stable-diffusion-webui/models/Lora”