There's not much information online about what LoRA training settings.
Below, we'll go through and explain all the LoRA training settings in Kohya SS, the popular model training user interface.
You can also check out previous entries in the LoRA series to learn more:
- High level overview for fine-tuning Stable Diffusion, including main concepts and main methods
- What LoRAs are, how they compare to other training methods, and how to use them.
- How to train LoRA on SDXL
This is a long one, so use the table of contents to navigate!
- Getting Started
- Source Models Tab
- Folders Tab
- Parameters Tab
- Basic Subtab
- LoRA Type
- LoRA network weights
- Train batch size
- Epoch
- Max train epoch
- Save every N epochs
- Caption Extension
- Mixed Precision
- Save Precision
- Number of CPU threads per core
- Seed
- Cache Latents
- Cache Latents to Disk
- Learning rate
- LR Scheduler
- LR warmup (% of steps)
- Optimizer
- LR number of cycles
- LR power
- Optimizer extra arguments
- Max resolution
- Stop text encoder training
- Enable buckets (checkbox)
- Minimum Bucket Resolution, Maximum Bucket Resolution
- Text Encoder learning rate
- Unet learning rate
- Network Rank (Dimension)
- Network Alpha
- Scale weight norms
- Network dropout
- Rank dropout
- Module dropout
- Basic Subtab
Getting Started
Check the Github repo for installation instructions for your platform.
Once installed, double click on gui-user.bat. This will open a Command Prompt. Look for the line Running on local URL:
Open the URL you are provided with.
Select the LoRA tab. Make sure you aren't in the Dreambooth tab, because it looks very similar to the LoRA tab!

Source Models Tab
Model Quick Pick
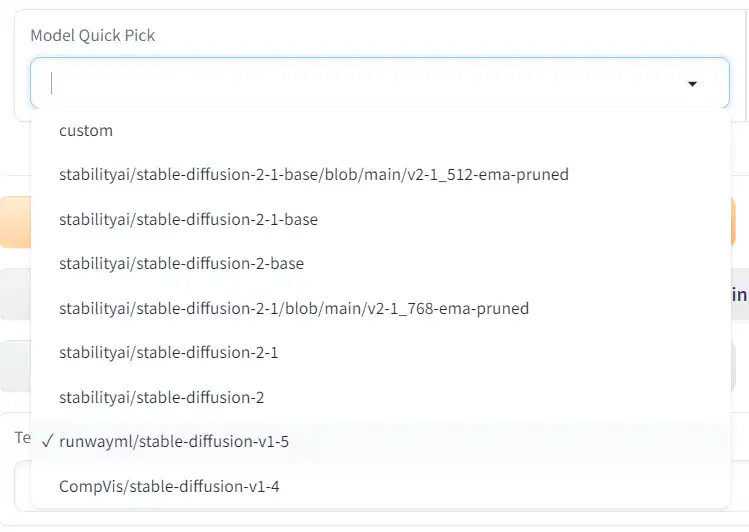
This is for selecting the base model. Keep in my LoRAs trained from Stable Diffusion 1.x models will only be usable with models trained from Stable Diffusion 1.x models. The same goes for SD 2.x and SDXL LoRAs.
Your LoRA will be heavily influenced by the base model, so you should use one that produces the style of images that you would like to create.
Kohya provides the SD 1.x and SD 2.x models as options.
Save trained model as
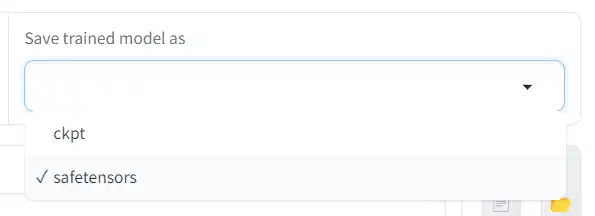
The file format of the LoRA model you're training.
ckpt was once the standard format used for Stable Diffusion models, but this format has security issues, so a safer file format called safetensors was created.
You should always choose safetensors.
Pretrained model name or path

This field will only appear if you select custom.
Write the full path of the model you are training on. You can also click the file button to select the model in finder.
If you are training on cloud GPUs with Colab or Runpod follow the respective directions to find your model path.
v2 (checkbox)
If you are training on a Stable Diffusion v2.x model, check this.
v_parameterization (checkbox)
This is a technique introduced in the Stable Diffusion v2.x models, to train models with fewer steps.
It only applies to v2.x models, and you should only turn it on if you know your base model supports it.
SDXL model (checkbox)
If you are training on an SDXL model, check this.
Folders Tab
Image folder
The folder containing the folder that contains your images.
For example, you might have a folder called images. Inside of this is a folder called 1_cat. Inside of this are your training images.
Output folder
The folder your LoRAs will be output to when they are complete.
If you output multiple models during training, they will all appear in this folder.
If you ouput sample images during training, they will also appear in this folder.
If you train a model, and then train a second model but don't change the Output folder or Model output name, your first model will be overwritten.
Regularisation folder
Optional
A regularization image is any image that is in the same class as what you are training, but not of the subject to be trained on.
It provides a dampening effect to the training and can prevent class-drift and overfitting.
So if your subject is Dwayne "The Rock" Johnson, your regularization images would be any man that isn't The Rock.
They aren't a hard requirement, and are really only necessary if you are training on a very large number of images.
Logging folder
Optional
Specifying the logging folder will create log files, that can be visualized with the tools Tensorboard or WandB.
Model output name
The name of your LoRA.
Naming with version numbers such as "therock_v1" will help you stay organized.
Training comment
You can embed text as metadata in the finished LoRA file.
You can check the metadata of LoRA files by clicking on the ⓘ (information icon) on the LoRA card in the LoRA tab of the Stable Diffusion WebUI.
Parameters Tab
All of the training settings are in this tab.
Basic Subtab
LoRA Type
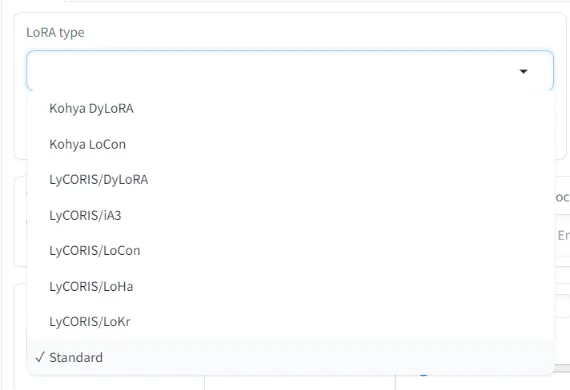
Specifies the type of LoRA you are training.
Standard is the most commonly used type.
LyCORIS is a group of optimizations and experimental methods for training. It is composed of a number of different ways to train and characterized by lower rank requirements and smaller sizes.
There is no problem with the Standard type at first. If you are having trouble learning, try another type.
LoRA network weights
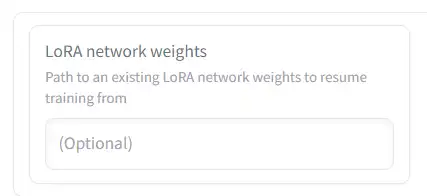
Let's say you've already created a LoRA. You can use this option to train it further.
Put the path to the LoRA here, and all settings will be applied used this LoRA as a starting point for training.
The output will be saved as a new file, so your original LoRA will not be overwritten.
DIM from weights
You can only use this option if you have entered a path in LoRA network weights.
As shown in the figure above, LoRA adds a smalll neural network, but the number of ranks in the middle layer can be freely set with Network Rank (described later).
However, turning this option on will set the number of ranks of the created LoRA to the same number of ranks as the LoRA specified in LoRA network weights. When this is turned on, the specification of Network Rank is ignored.
For example, when the number of LoRA ranks used for additional learning is 32, the number of LoRA ranks to be created will also be set to 32.
Train batch size
Batch size is the number of images that will be trained at once. A batch size of 2 will train two images simultaneously.
A higher batch size will increase speed, and require more VRAM.
Increasing batch size is good for quality, but it has diminishing returns after a point.
You should set batch size to whatever you can realistically run with your GPU.
Epoch
An epoch is how many times the training happens on the whole data. Closely related to steps and repeats.
- A step is training the model on one batch of pictures one time.
- A repeat is how many times a given picture is taught to the model during an epoch.
- An epoch is training the model on the whole dataset as many times as repeats.
Max train epoch
Specify the maximum number of epochs for training.
You can set the epochs in the Epoch setting, so I haven't found a use for this.
Save every N epochs
You can save the progress as a LoRA file for each epoch number specified here.
For example, if you specify 10 in "Epoch" and specify 2 in "Save every N epochs", the LoRA file will be saved in the specified folder every 2 epochs (at the end of 2, 4, 6, 8 epochs).
Caption Extension
If you have prepared captions for images, write the extension here.
If this is blank, the extension will be ".caption".
Most likely your extension will be ".txt", in which case you'll write ".txt" here.
Ignore this if you don't have captions.
Mixed Precision
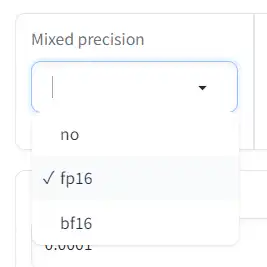
Machine learning has led to the development of novel floating point formats. Formats that require lower precision make it possible to hold more numbers in memory, meaning significant speedup.
If no is selected, the weight data will be encoded with 32-bit precision.
The other two options encode data with 16-bit precision:
fp16(floating-point 16) half precision 16-bit floating point formatbf16(bfloat 16/brain floating point), developed by Google Brain, has 16 bits like fp16, but has the same number of exponent bits as fp32
You can get LoRA with a sufficiently high accuracy at fp16.
Save Precision
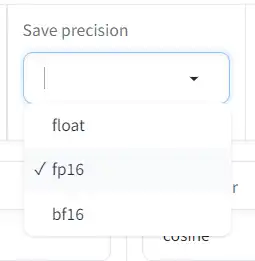
The format to save the LoRA file with. 16-bit formats will produce smaller file sizes than 32-bit.
Number of CPU threads per core
The number of threads per CPU core during training. Basically, the higher the number, the higher the training efficiency.
Default is 2.
Seed
During learning, there are a number of random processes such as the order images are read in.
Seed is like an ID for randomized procedures. If the same seed is specified, the same random procedure will be used, making it easier to duplicate training results.
However, there are random processes that do not use this seed (such as the random cropping of images), so specifying the same seed does not always give the same training results.
The default is blank. If not specified, the seed will be randomized when training is executed.
If you want to reproduce the result as much as possible, there is no loss by setting a number (such as 1234) appropriately.
Cache Latents
Training images are read into VRAM and encoded into latent format before entering the U-Net. Cache latents means that these latent images are kept in main memory instead of being encoded every time.
This saves VRAM and speeds the process up.
The downside is that the only augmentation (described later) that can be used is flip_aug. Also, random crop (described later) cannot be used.
Cache Latents to Disk
Similar to the Cache Latents option, but checking this allows you to specify that compressed image data be saved to disk as temporary files.
This temporary file can be reused even after restarting kohya_ss, so if you want to do LoRA learning with the same data many times, turning on this option will increase learning efficiency.
However, if you turn this on, you will not be able to use augmentation (other than flip_aug) and random crop.
Default is off.
Learning rate
Learning rate is a key parameter in model training. Practically: the bigger the number, the faster the training but the more details are missed.
LR Scheduler
The Learning Rate Scheduler determines how the learning rate should change over time.
An optimal training process will use a learning rate that changes over time.
You might want your model to recognize the key features of your dataset by learning fast at the beginning and then gradually decrease the learning rate for the model to recognize smaller details.
Here's what happens in the training process when you choose Constant, Linear, Cosine or Cosine with restarts schedulers:
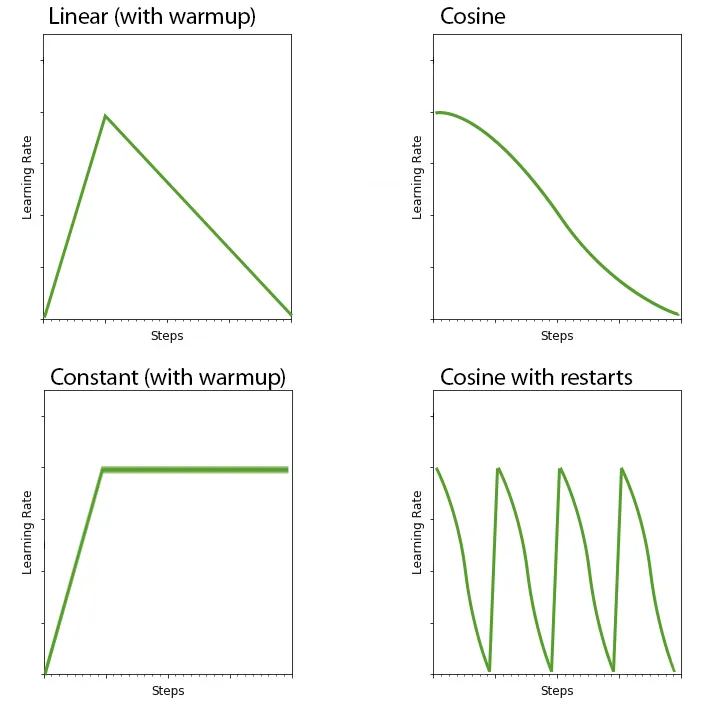
This is closely related to the next setting, LR warmup.
LR warmup (% of steps)
During the first X% steps of training, you can warm up the training.
If you have selected constant_with_warmup in the scheduler, set here how many times to warm up.
This only applies to the LR scheduler constant_with_warmup.
Default is 10.
Optimizer
The optimizer affects how the neural network is changed during training.
AdamW and AdamW8bit are the most commonly used optimizers for LoRA training.
AdamW8bit uses less VRAM and is fairly accurate.
There's also Adafactor, which adjusts the learning rate appropriately according to the progress of learning while adopting the Adam method Learning rate setting is ignored when using Adafactor).
"DAdapt" is an optimizer that adjusts the learning rate , and "Lion" is a relatively new optimizer , but it has not been fully verified yet.
"SGDNesterov" has good learning accuracy but is slower.
The default is AdamW8bit.
LR number of cycles
If you select " Cosine with restart" or "Polynomial" for the scheduler, this option specifies how many cycles the scheduler runs during training.
If the number of this option is 2 or greater, the scheduler will run multiple times during a single training run.
In both Cosine with restart and Polynomial, the learning rate gradually decreases to 0 as learning progresses, but if the number of cycles is 2 or more, the learning rate is reset and restarted when the learning rate reaches 0.
The figure below (source) is an example of the change in learning rate for Cosine with restart (purple) and Polynomial (light green).
The purple example has the number of cycles set to 4. The light green example has a cycle number of 1.
Since the specified number of cycles is executed within the determined learning step, the more the number of cycles increases, the more the learning rate changes.
Default is blank, leaving blank equals 1.

Cosine with restart "LR number of cycle = 4" (purple)
Polynomial "LR power = 2" (light green)
LR power
This is an option when the scheduler is set to Polynomial. The higher this number, the steeper the initial learning rate drops. (The slope of the light green line in the image above becomes steeper).
When power is 1, it has the same shape as the linear scheduler.
If the number is too large, the learning rate will stick close to 0, resulting in insufficient learning, so be careful.
Defaults to blank, leaving blank equals 1 (that is, the same as the linear scheduler).
Optimizer extra arguments
If you want more granularity for a given optimizer , write the command here.
You can usually leave this field blank.
Max resolution
Specify the maximum resolution of the training image in the order of "width, height". If the training images exceed the resolution specified here, they will be scaled down to this resolution.
The default is "512,512".
Many models use images of this size, so it is safe to use images of this size when learning LoRA.
For SDXL training, you should use "1024,1024"
Stop text encoder training
You can stop learning the text encoder in the middle. As I wrote above, the update of the text encoder has a big impact on the whole, so it is easy to fall into overfitting (tuning too much to the training image and other images can not be drawn), and it is also overfitting to stop learning at a moderate point is one way to prevent
The number specified here is a percentage of the total training step. Once learning reaches this percentage, the text encoder stops learning.
For example, if the total number of steps is 1000 and you specify 80 here, the text encoder will finish training when the learning progress is 80%, i.e. 1000x0.8=800 steps.
U-Net training continues with the remaining 200 steps.
If this is 0, the text encoder training will not stop until the end.
Enable buckets (checkbox)
The training images you use don't have to be the same size, but images that are different sizes can't be trained at the same time.
We solve this by sorting images into "buckets" based on their size.
(If your training images are all the same size, this checkbox will not do anything)
*If you turn off Enable buckets when the size of the training images is not unified, the training images will be enlarged or reduced to have the same size.
Enlargement and reduction are performed while maintaining the aspect ratio of the image. If the aspect ratio is not the same as the standard size, the vertical or horizontal size of the image after scaling may exceed the standard size. For example, if the base size is 512x512 ( 1 aspect ratio ) and the image size is 1536x1024 ( 1.5 aspect ratio ), the image will be scaled down to 768x512 ( 1.5 aspect ratio remains).
Minimum Bucket Resolution, Maximum Bucket Resolution
If using buckets, specify the minimum and maximum interval for each bucket here.
For example, if you specify 64 here, each training image will be sorted into separate buckets by 64 pixels according to their size. This sorting is done for each vertical and horizontal.
If the image size does not fit the specified size of the bucket, the protruding part will be cut off.
For example, if the maximum resolution is 512 pixels and the bucket step size is every 64 pixels , then the buckets will be 512, 448, 384... but a 500 pixel image will be put into a 448 pixel bucket, with an extra 52 pixels are clipped.
Default is 64 pixels.
* If this number is too small, the buckets will be divided too finely, and in the worst case, it will be like "one bucket for each image".
Note that we always load images from the same bucket for each batch, so having too few images in a bucket will unintentionally reduce the number of batches.
Text Encoder learning rate
Sets the learning rate for the text encoder . As I wrote earlier, the effect of additional training on text encoders affects the entire U-Net.
Therefore, it is usually set lower than the learning rate (Unet learning rate) for each block of U-Net.
The default value is 0.00005(5e-5).
If you specify a number here, it takes precedence over the Learning rate value.
Unet learning rate
Sets the learning rate for U-Net. This is the learning rate when performing additional learning on each attention block (and other blocks depending on the setting) in U-Net.
The default value is 0.0001.
If you specify a number here, it takes precedence over the Learning rate value.
Network Rank (Dimension)
Specifies the number of neurons in the hidden layer of the "additional small neural net " described earlier in the article (see the figure above for details).
The larger the number of neurons , the more learning information can be stored, but the possibility of learning unnecessary information other than the learning target increases, and the LoRA file size also increases.
Generally, it is often set to a maximum of about 128, but there are reports that 32 is sufficient.
When making LoRA on a trial basis, it may be better to start from around 2 to 8.
Default is 8.
Network Alpha
This was introduced as a convenience measure to prevent weights from being rounded to 0 when saving LoRA.
Due to its structure, LoRA tends to make the weight value of the neural network small, and if it becomes too small, it may become indistinguishable from zero (that is, it is the same as not learning anything).
A technique was proposed in which the actual (stored) weight value is kept large, but the weight is always weakened at a constant rate during learning to make the weight value appear smaller. Network alpha determines this "weight weakening rate".
The smaller the Network alpha value, the larger the stored LoRA neural net weights.
How much the weight weakens when used (usage strength) is calculated by "Network_Alpha/Network_Rank" (roughly a value between 0 and 1) and is closely related to the Network Rank number.
If the accuracy of LoRA after learning is not good enough, the weight data may be too small and collapsed to 0. In such a case, try lowering the Network Alpha value (=increasing the save weight value).
The default is 1 (that is, maximize the stored weight value).
If Network Alpha and Network Rank have the same value, the effect will be turned off.
*Network Alpha value must not exceed Network Rank value. It is possible to specify a higher number, but there is a high probability that it will result in an unintended LoRA.
Also, when setting the Network Alpha, you should consider the effect on the learning rate.
For example, with an Alpha of 16 and a Rank of 32, the strength of the weight used is 16/32 = 0.5, meaning that the learning rate is only half as powerful as the Learning Rate setting.
If Alpha and Rank are the same number, the strength used will be 1 and will have no effect on the learning rate.
Scale weight norms
Max Norm Regularization is a technique to stabilize network training by limiting the norm of network weights. It may be effective in suppressing overfitting of LoRA and improving stability when used with other LoRAs.
See PR #545 on kohya_ss/sd_scripts repo for details. Recommended setting: 1. Higher is weaker, lower is stronger.
Network dropout
Is a normal probability dropout at the neuron level. In the case of LoRA, it is applied to the output of down. Recommended range 0.1 to 0.5
Rank dropout
can specify `rank_dropout` to dropout each rank with specified probability. Recommended range 0.1 to 0.3
Module dropout
can specify `module_dropout` to dropout each rank with specified probability. Recommended range 0.1 to 0.3


Thanks, its help me)
Glad it could help