This is my complete guide for ComfyUI, the node-based interface for Stable Diffusion.
In it I'll cover:
- What ComfyUI is
- How ComfyUI compares to AUTOMATIC1111 (the reigning most popular Stable Diffusion user interface)
- How to install it
- How it works (with a brief overview of how Stable Diffusion works)
- How to use it to accomplish popular Stable Diffusion tasks (img2img, inpainting, LoRAs)
- My recommended workflows
So without further ado, let's get started.
What is ComfyUI and what does it do?
ComfyUI is a node-based user interface for Stable Diffusion.
ComfyUI was created in January 2023 by Comfyanonymous, who created the tool to learn how Stable Diffusion works.
To give you an idea of how powerful it is: StabilityAI, the creators of Stable Diffusion, use ComfyUI to test Stable Diffusion internally. They have since hired Comfyanonymous to help them work on internal tools.[1]
ComfyUI looks like this:

Node-based interfaces are most commonly found in the 3D Design and VFX industries. You might have encountered them if you've used tools like Maya or Blender3D.
In these interfaces, every node executes some code.
Nodes have inputs, values that are passed to the code, and ouputs, values that are returned by the code.
Using the mouse, users are able to:
- create new nodes
- edit parameters (variables) on nodes
- connect nodes together by their inputs and outputs
In ComfyUI, every node represents a different part of the Stable Diffusion process. By creating and connecting nodes that perform different parts of the process, you can run Stable Diffusion.
ComfyUI VS AUTOMATIC1111
A lot of newcomers to ComfyUI are coming from much simpler interfaces like AUTOMATIC1111, InvokeAI, or SD.Next.
They're all wondering the same thing:
Why would you use such a complicated tool to do the same thing?
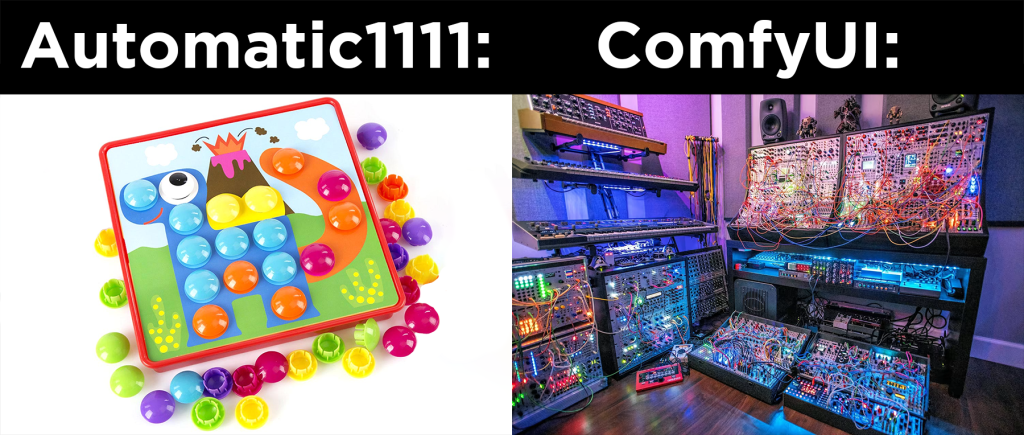
Well, you can do the same thing, but you can also do so much more.
Extreme configurability
Want to output preview images at any stage in the generation process?
Want to run 2 generations at the same time to compare sampling methods?
This is my favorite reason to use ComfyUI.
ComfyUI lets you do many things at once
Imagine that you follow a similar process for all your images: first, you do generate an image. Then you send the result to img2img. Finally, you upscale that.
In AUTOMATIC1111, you would have to do all these steps manually.
In ComfyUI, you can perform all of these steps in a single click.
This is well suited for SDXL v1.0, which comes with 2 models and a 2-step process: the base model is used to generate noisy latents, which are processed with a refiner model specialized for denoising (practically, it makes the image sharper and more detailed).

Performance and speed
Because they are so configurable, ComfyUI generations can be optimized in ways that AUTOMATIC1111 generations cannot.
This greatly optimizes the speed, with people reporting 3-5x faster generations with ComfyUI compared to AUTOMATIC1111.
Learn how Stable Diffusion works
ComfyUI is set up so that nodes reflect how a different part of the diffusion process works underneath the hood. By learning how to use ComfyUI, you'll learn how Stable Diffusion actually works!
How to install ComfyUI
Quick-Install (Windows, NVIDIA)
There is a portable standalone version of ComfyUI that will let you run ComfyUI with NVIDIA GPU or CPU. CPU generation is very slow, so this may as well be a NVIDIA-only installer:
Click this link and your download will start:
Extract the .zip file with 7-Zip.
You will get a folder called ComfyUI_windows_portable containing the ComfyUI folder.
Double click the file run_nvidia_gpu.bat to run with NVIDIA GPU, or run_cpu.bat to run with CPU.
Clone from Github (Windows, Linux)
NVIDIA GPU
Windows, open your Command Prompt (Search for "cmd"). Linux, open your Terminal (Ctrl+Alt+T) .
Then run the follow commands one by one:
git clone http://github.com/comfyanonymous/ComfyUI
cd ComfyUI
pip install torch torchvision torchaudio --extra-index-url http://download.pytorch.org/whl/cu118 xformers -r requirements.txt
You can now launch ComfyUI with the command:
python main.pyTroubleshooting
If you get the "Torch not compiled with CUDA enabled" error, uninstall torch:
pip uninstall torch(when prompted, press "y")
And install it again with the same command as before:
pip install torch torchvision torchaudio --extra-index-url http://download.pytorch.org/whl/cu118 xformers -r requirements.txtAMD GPU
Windows, open your Command Prompt (Search for "cmd"). Linux, open your Terminal (Ctrl+Alt+T) .
Then run the follow commands one by one:
git clone http://github.com/comfyanonymous/ComfyUI
cd ComfyUI
python -m pip install torch torchvision torchaudio --extra-index-url http://download.pytorch.org/whl/rocm5.4.2 -r requirements.txt
If that fails because your GPU isn't officially supported by ROCm (6700 XT , etc..), you can try running the command:
HSA_OVERRIDE_GFX_VERSION=10.3.0 python main.pyYou can now launch ComfyUI with the command:
python main.pyClone from Github (Mac)
You can install ComfyUI in Apple Mac silicon (M1 or M2) with any recent macOS version.
Install pytorch by following the Accelerated PyTorch training on Mac guide.
Open the terminal and clone the repository:
git clone http://github.com/comfyanonymous/ComfyUIInstall the ComfyUI dependencies:
cd ComfyUI
pip install -r requirements.txt
If you have another Stable Diffusion UI you might be able to reuse the dependencies.
Launch ComfyUI by running:
python main.py --force-fp16Note that --force-fp16 will only work if you installed the latest pytorch nightly.
Updating ComfyUI
You can only update ComfyUI if you cloned it from Github (you did not get the Quick-Install standalone version).
To update ComfyUI navigate to the ComfyUI folder in your Command Prompt/Terminal and type:
git pullComfyUI User Interface
Nodes
You can add a node by right clicking on blank space -> Add Node.
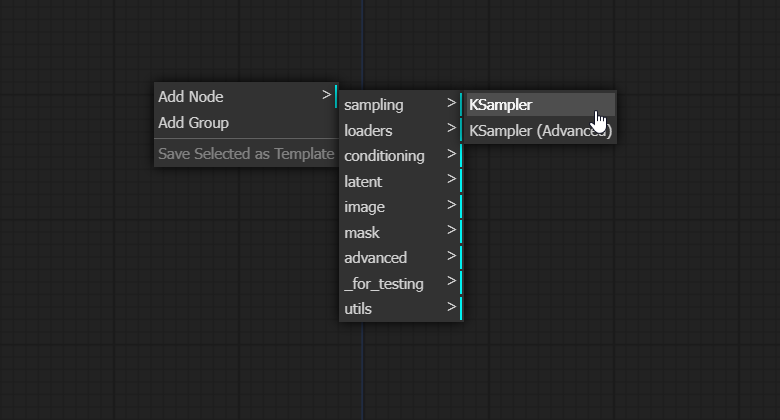
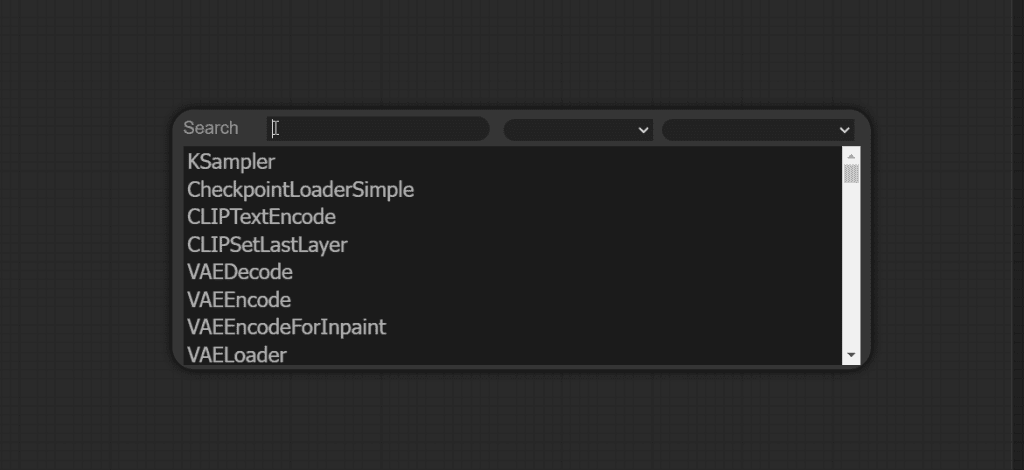
You can double click on blank space to get the list of all nodes and a searchbar:
CTRL + drag lets you select multiple nodes. You can move them together with SHIFT + drag.
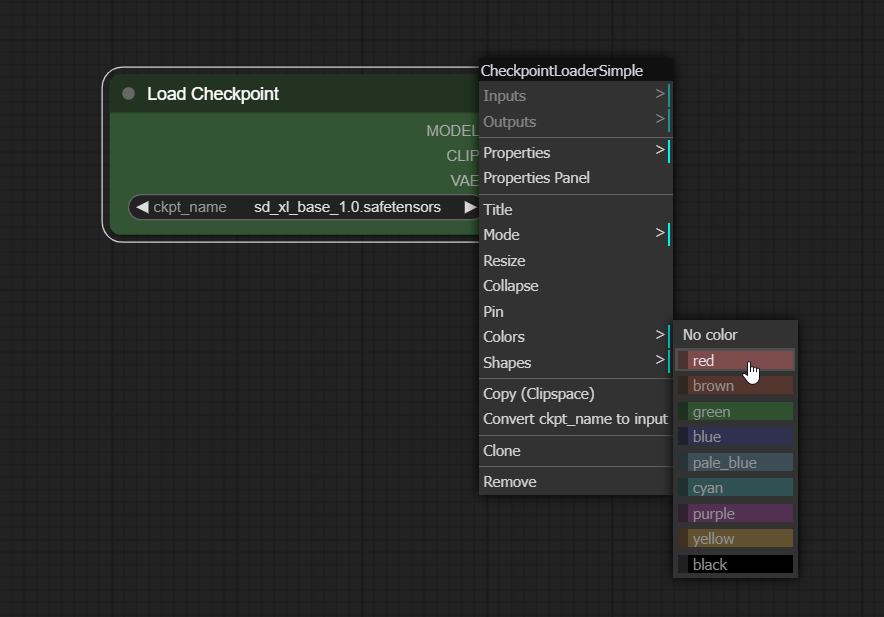
You can change the color of nodes to help you stay organized. Right click -> Color -> select color:
Connecting Nodes
If you drag and release an input into blank space, you will get a list of compatible nodes:
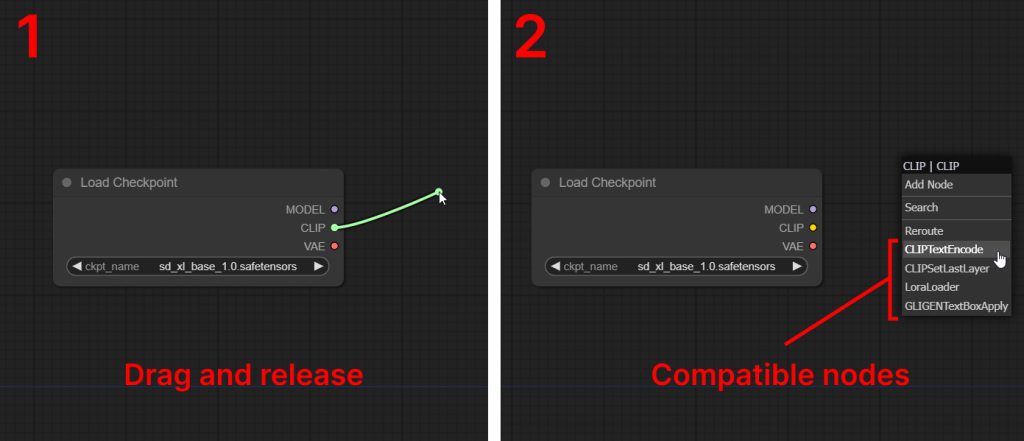
Inputs and outputs are only compatible if they are the same color. Notice how I can connect the purple input to the purple output, but cannot connect any of the rest.

Execution
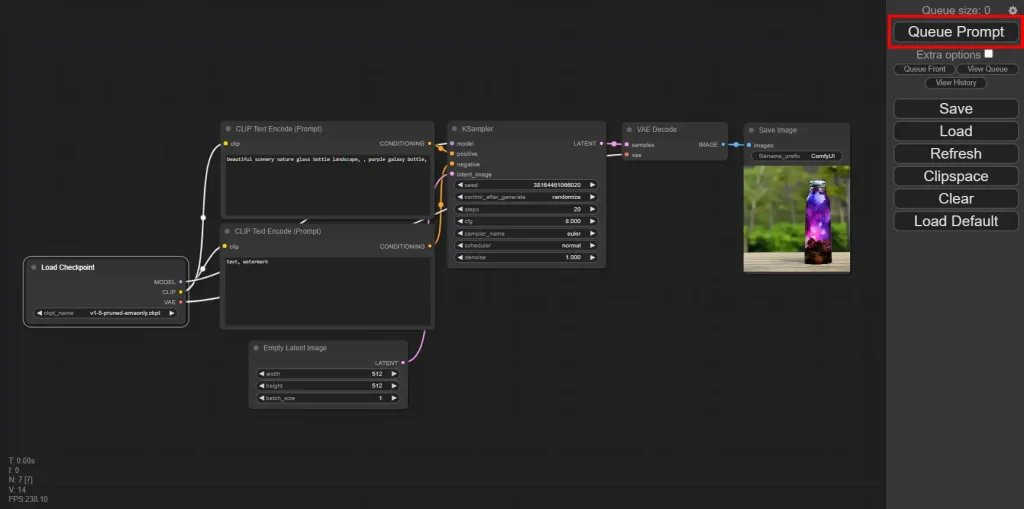
When you click Queue Prompt, the workflow passes through the nodes in the order they're connected, starting from Loaders, which have no inputs, only outputs.
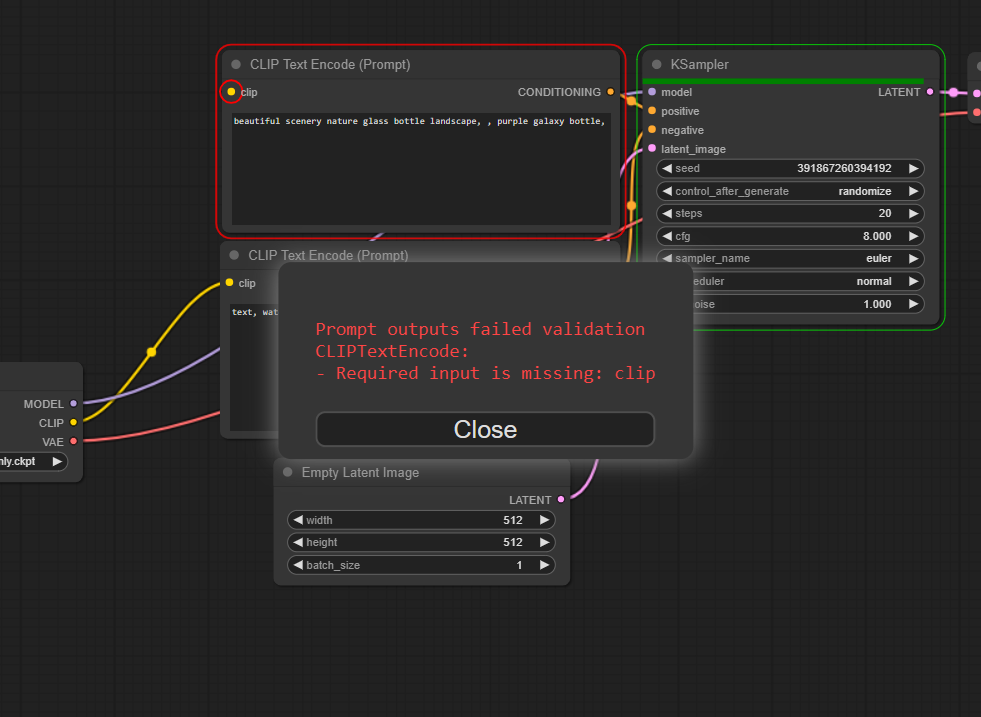
If any nodes are missing inputs, you will not be able to run the prompt:
ComfyUI Nodes Explained
How do we understand what's actually going on so that we can create and modify workflows?
To understand nodes, we have to understand a bit about how Stable Diffusion works.
Let's take a look at the default workflow.
If you're not on the default workflow, or you've been messing around with the interface, click Load Default on the right sidebar.
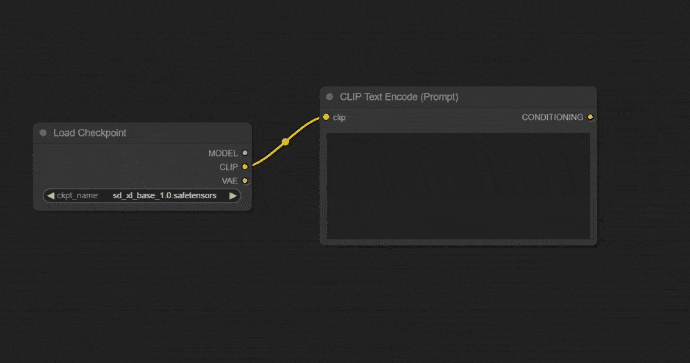
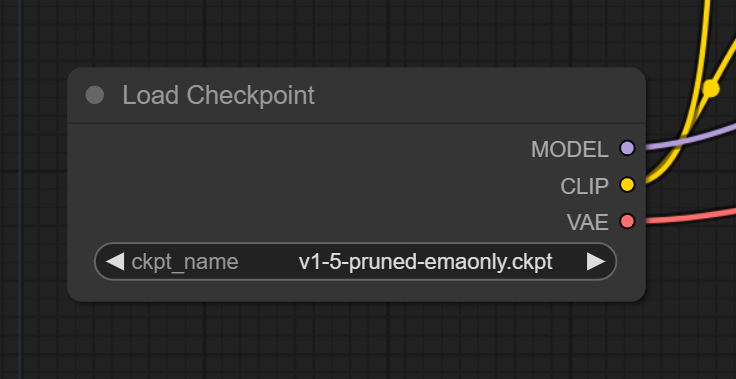
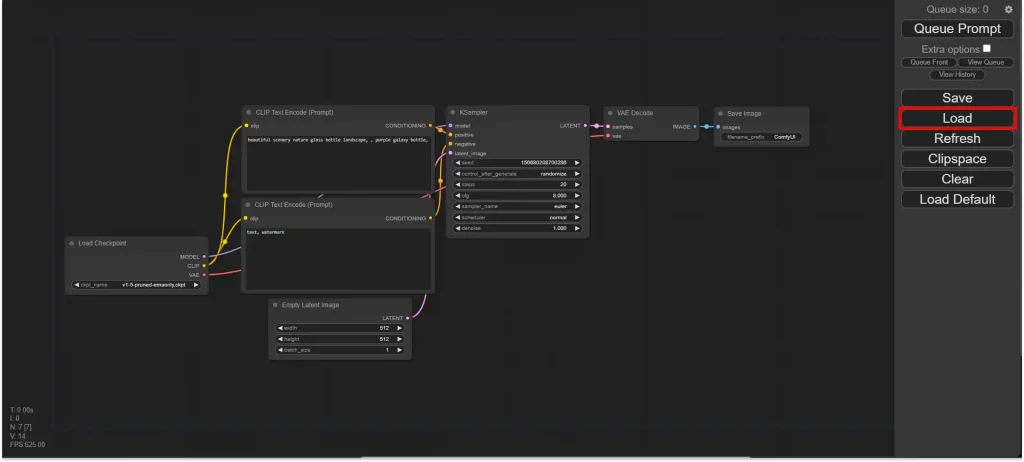
Load Checkpoint Node
The .safetensors or .ckpt checkpoint models you use to generate images have 3 main components:
- CLIP model: to convert text into a format the Unet can understand
- Unet: to perform the "diffusion" process, the step-by-step processing of images that we call generation
- VAE: to decode the image from latent space into pixel space (also used to encode a regular image from pixel space to latent space when we are doing img2img)
In the ComfyUI workflow this is represented by the Load Checkpoint node and its 3 outputs (MODEL refers to the Unet).
What are these outputs hooked up to?
CLIP Text Encode Node
The CLIP output of the Load Checkpoint node connects to CLIP Text Encode nodes.
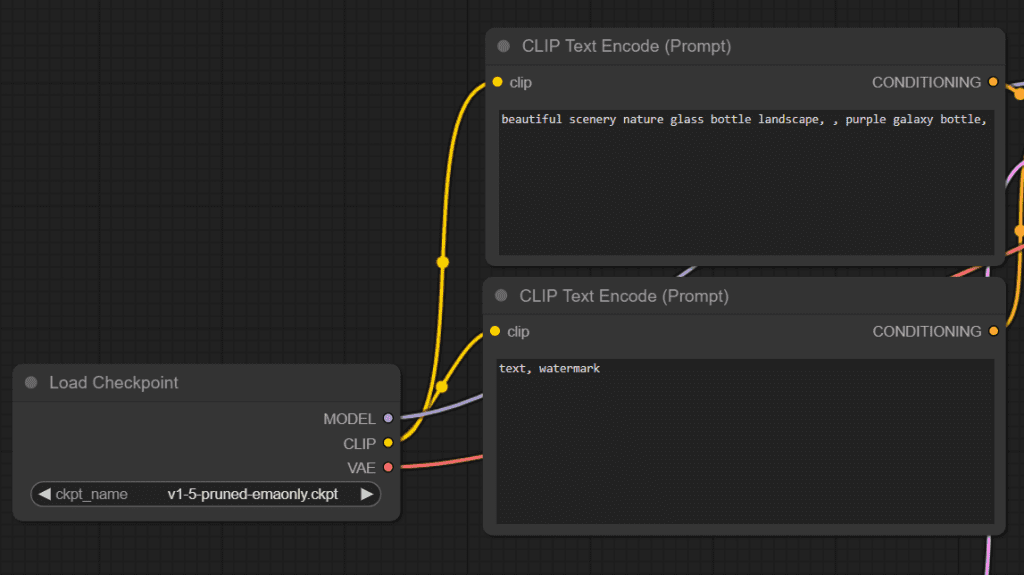
The CLIP model is used to convert text into a format that the Unet can understand (a numeric representation of the text). We call these embeddings.
The CLIP Text Encode nodes take the CLIP model of your checkpoint as input, take your prompts (postive and negative) as variables, perform the encoding process, and output these embeddings to the next node, the KSampler.
KSampler
In Stable Diffusion images are generated by a process called sampling.
In ComfyUI this process takes place in the KSampler node. This is the actual "generation" part, so you'll notice the KSampler takes the most time to run when you queue a prompt.
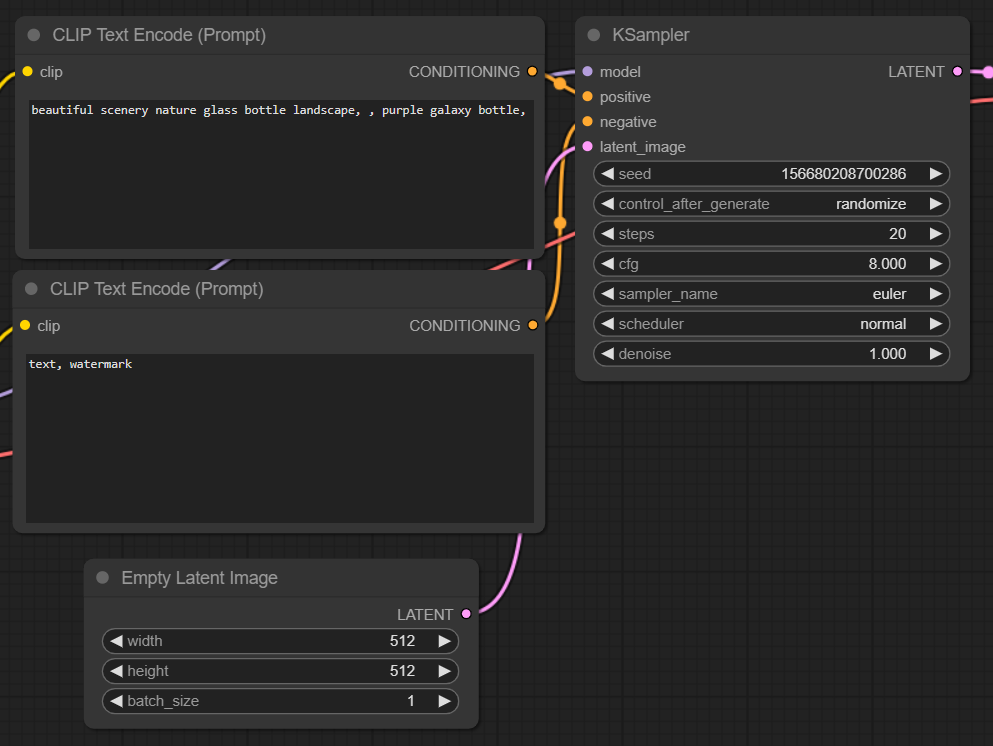
The KSampler takes the following inputs:
model:MODELouput (Unet) from Load Checkpoint nodepositive: the positive prompt encoded by the CLIP model (CLIP Text Encode node)negative: the negative prompt encoded by the CLIP model (other CLIP Text Encode node)latent_image: an image in latent space (Empty Latent Image node)
Since we are only generating an image from a prompt (txt2img), we are passing the latent_image an empy image using the Empty Latent Image node.
(You can also pass an actual image to the KSampler instead, to do img2img. We'll talk about this below)
What's going on in the KSampler?
Diffusion is the process that actually generates the images.
We start with a random information array and the embeddings (encoded positive and negative prompts).
Diffusion happens in multiple steps, each step operates on a the information array (also called latents), and produces another information array that better resembles the prompt text.
So we start with a random information array, and end up with one that resembles something we know.
The KSampler outputs this information. However, it is not in pixel space just yet (we can't see it), it's still a latent representation.
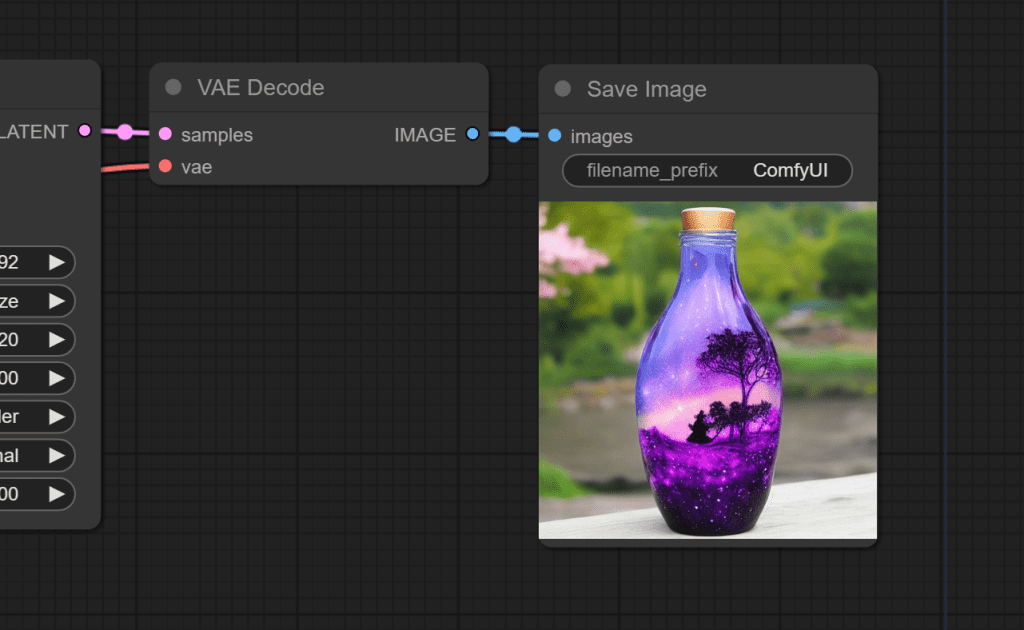
VAE
The VAEDecode node takes 2 inputs:
- The VAE that came with our checkpoint model (you can also add your own VAE)
- The latent space image that our KSampler has finished denoising.
The VAE is used to translate an image from latent space to pixel space.
It passes this final pixel image to the Save Image node, which is used to show us the image and let us download it.
The default workflow is the simplest workflow you will find in ComfyUI.
Downloading Models
For running SDXL, it's likely that you'll want a couple of other models as well.
You can get started by downloading the checkpoint models, and download the rest of the models if the need arises.
Checkpoints
Place checkpoints in the folder ComfyUI/models/checkpoints:
VAE
Place VAEs in the folder ComfyUI/models/vae
LoRAs
Place LoRAs in the folder ComfyUI/models/loras
Upscaler
For upscaling your images: some workflows don't include them, other workflows require them.
Place upscalers in the folder ComfyUI/models/upscaler
Let's say you have another UI such as AUTOMATIC1111 installed. You don't want to take up extra hard drive space by copying all of your checkpoint models into both the AUTOMATIC1111 folder and the ComfyUI folder.
See the Config file to set the search paths for models.
In the standalone windows build you can find this file in the ComfyUI directory. Rename this file to extra_model_paths.yaml and edit it with your favorite text editor.
Recommended Workflows
One of the best parts about ComfyUI is how easy it is to download and swap between workflows.
Here's a list of example workflows in the official ComfyUI repo.
To load a workflow, simply click the Load button on the right sidebar, and select the workflow .json file.
Some workflows alternatively require you to git clone the repository to your ComfyUI/custom_nodes folder, and restart ComfyUI.
Here are some popular workflows in the Stable Diffusion community:
Sytan's SDXL Workflow
One of the most popular workflows for SDXL. Features upscaling.

Searge SDXL Workflow
Has 3 operating modes (text-to-image, image-to-image, and inpainting) that are all available from the same workflow and can be switched with an option.

Recommended Installation:
- Navigate to your
ComfyUI/custom_nodes/directory - Open a command line window in the custom_nodes directory
- Run
git clone http://github.com/SeargeDP/SeargeSDXL.git - Restart ComfyUI


Thank you. I’m very impressed with this document.
Glad it was useful!