In this guide, we'll set up SDXL v1.0 with the node-based Stable Diffusion user interface ComfyUI.
ComfyUI was created by comfyanonymous, who made the tool to understand how Stable Diffusion works. It's since become the de-facto tool for advanced Stable Diffusion generation.
If this is your first time using ComfyUI, make sure to check out the beginner's guide to ComfyUI, which dives into more fundamental concepts.
Compared to other tools which hide the underlying mechanics of generation, ComfyUI''s user interface closely follows how Stable Diffusion actually works. This means if you learn how ComfyUI works, you will end up learning how Stable Diffusion works.
ComfyUI won't take as much time to set up as you might expect. Instead of creating a workflow from scratch, you can simply download a workflow optimized for SDXL v1.0.
In this guide, I'll use the popular Sytan SDXL workflow and provide a couple of other recommendations.
After you're all set up, you'll be able to generate SDXL images with one click:


You'll also be able to swap out the SDXL v1.0 model for custom models trained on SDXL, such as Dreamshaper XL:


ComfyUI VS AUTOMATIC1111
In the largest Stable Diffusion communities, r/StableDiffusion and the Stable Foundation Discord, the debate rages on: ComfyUI or AUTOMATIC1111?
(That's not to ignore other great interfaces: Vladmantic's SD.Next, InvokeAI)
Here's why you would want to use ComfyUI for SDXL:
Workflows do many things at once
Imagine that you follow a similar process for all your images: first, you do text-to-image. Then you send the result to img2img. Finally, you upscale that.
In AUTOMATIC1111, you would have to do all these steps manually. In ComfyUI on the other hand, you can perform all of these steps in a single click.
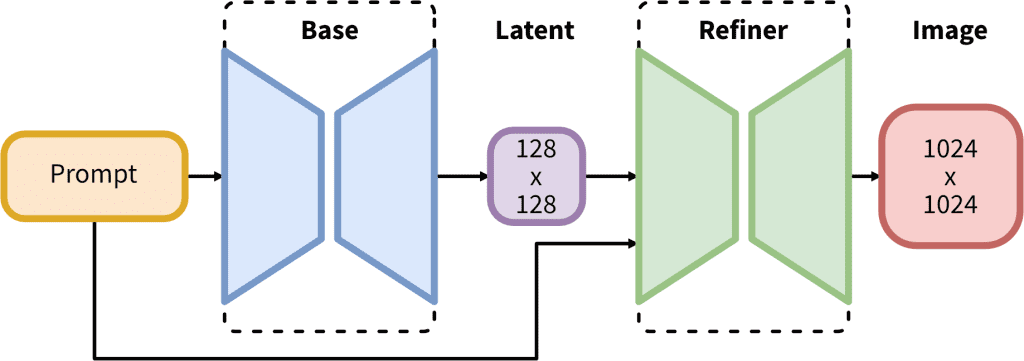
This is well suited for SDXL v1.0, which comes with 2 models and a 2-step process: the base model is used to generate noisy latents, which are processed with a refiner model specialized for the final denoising steps.
The base model can be used alone, but the refiner model can add a lot of sharpness and quality to the image. You can read more about the tech in the official paper.
Generation Speed
Because they are so configurable, ComfyUI generations can be optimized in ways that AUTOMATIC1111 generations cannot.
The workflow we're using does a portion of the image with base model, sends the incomplete image to the refiner, and goes from there.
This greatly optimizes the speed. People report 6-10x faster generation times with ComfyUI compared to AUTOMATIC1111
Step 1: Download models
You'll need to download both the base and the refiner models:
(optional): There are many custom models that offer higher quality generations than the base SDXL model.
Download Upscaler
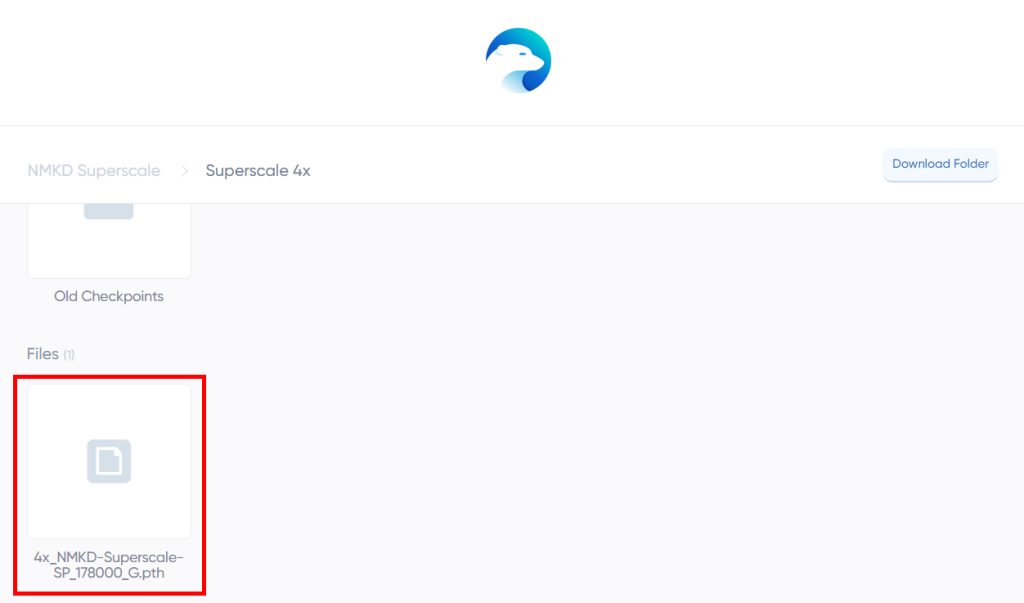
We'll be using NMKD Superscale x4 upscale your images to 2048x2048.
Go to this link: https://icedrive.net/s/14BM8qlGO6
Click on the folder Superscale 4x and download the file inside with extension .pth:
Step 2: Download ComfyUI
Direct download only works for NVIDIA GPUs. For AMD (Linux only) or Mac, check the beginner's guide to ComfyUI.
Direct link to download
Simply download this file and extract it with 7-Zip.
The extracted folder will be called ComfyUI_windows_portable.
- Place the models you downloaded in the previous step in the folder:
ComfyUI_windows_portable\ComfyUI\models\checkpoints - If you downloaded the upscaler, place it in the folder:
ComfyUI_windows_portable\ComfyUI\models\upscale_models
Step 3: Download Sytan's SDXL Workflow
Go to this link and download the JSON file by clicking the button labeled Download raw file.

Step 4: Start ComfyUI
Click run_nvidia_gpu.bat and ComfyUI will automatically open in your web browser.
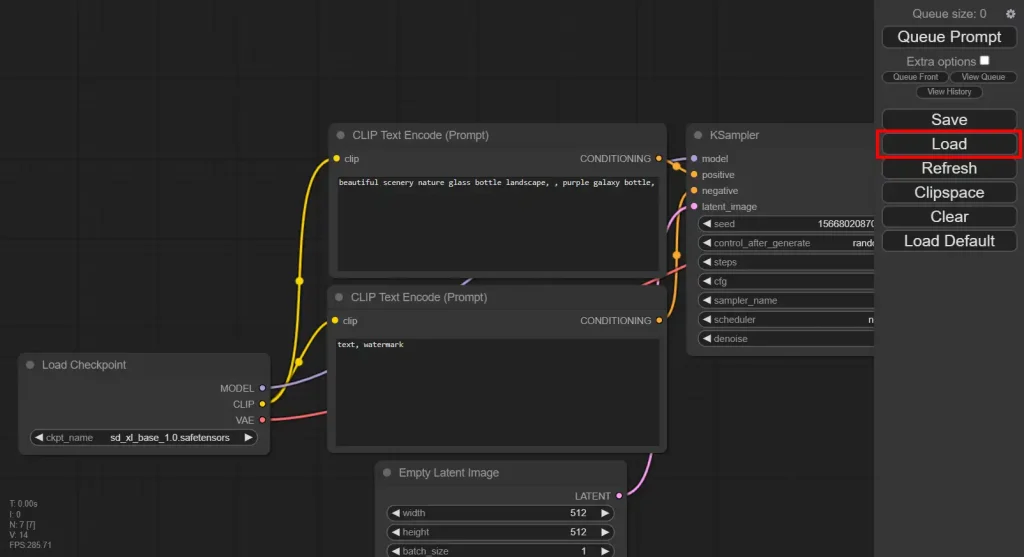
Click the Load button and select the .json workflow file you downloaded in the previous step.
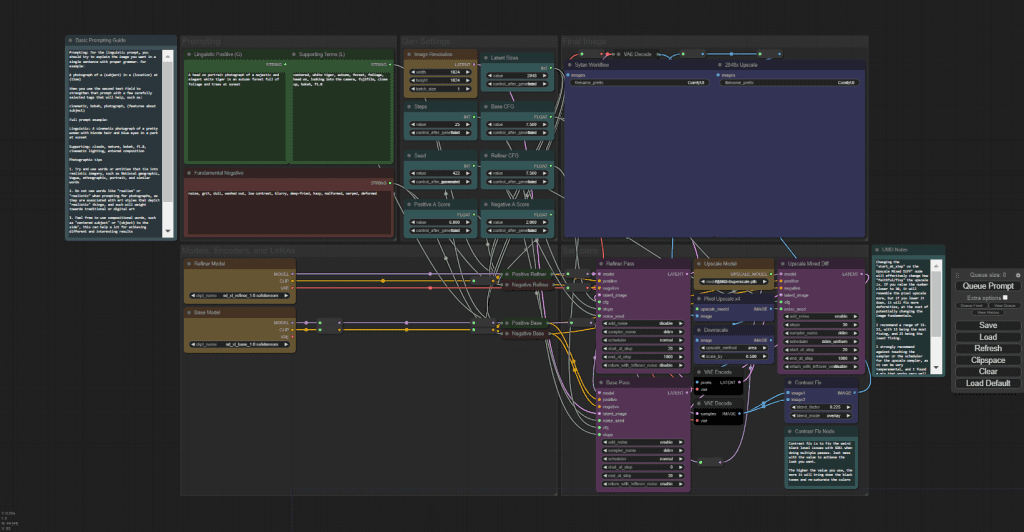
Sytan's SDXL Workflow will load:
Testing Your First Prompt
You can scroll and hold down on blank space to pan around.
Let's run our first prompt.
First, you'll need to connect your models. In the yellow Refiner Model box, select sd_xl_refiner_1.0.safetensors.

Then in the yellow Base Model box, select sd_xl_base_1.0.safetensors.

If you downloaded the upscaler, make sure you select in in the Upscale Model node:
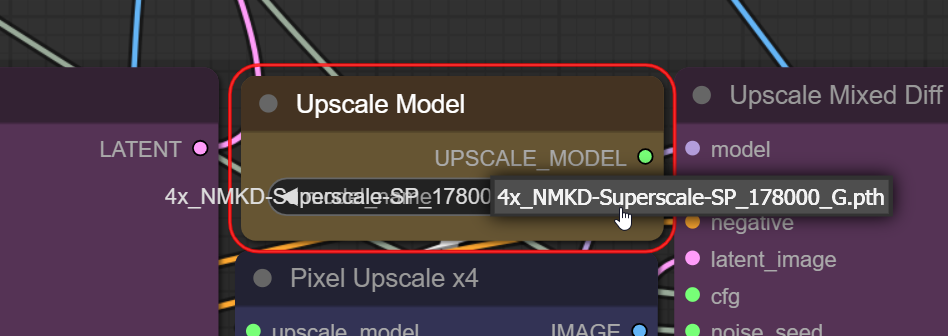
Now you're ready to run the default prompt. Click Queue Prompt.
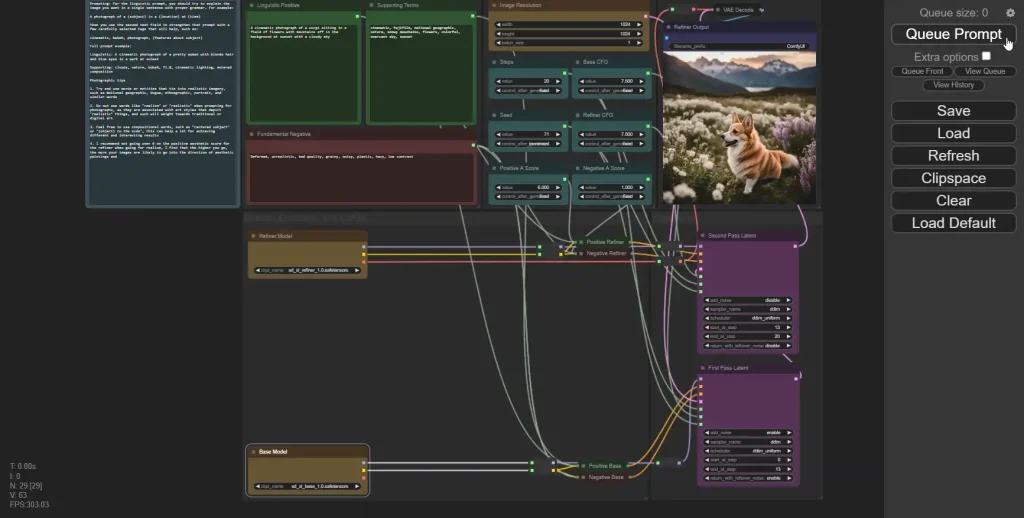
Boxes will be outlined in green when they are running.
You'll notice that the generation time will be much faster than that of AUTOMATIC1111.

After you get the result, you can right click the image -> Save Image to download to your computer.
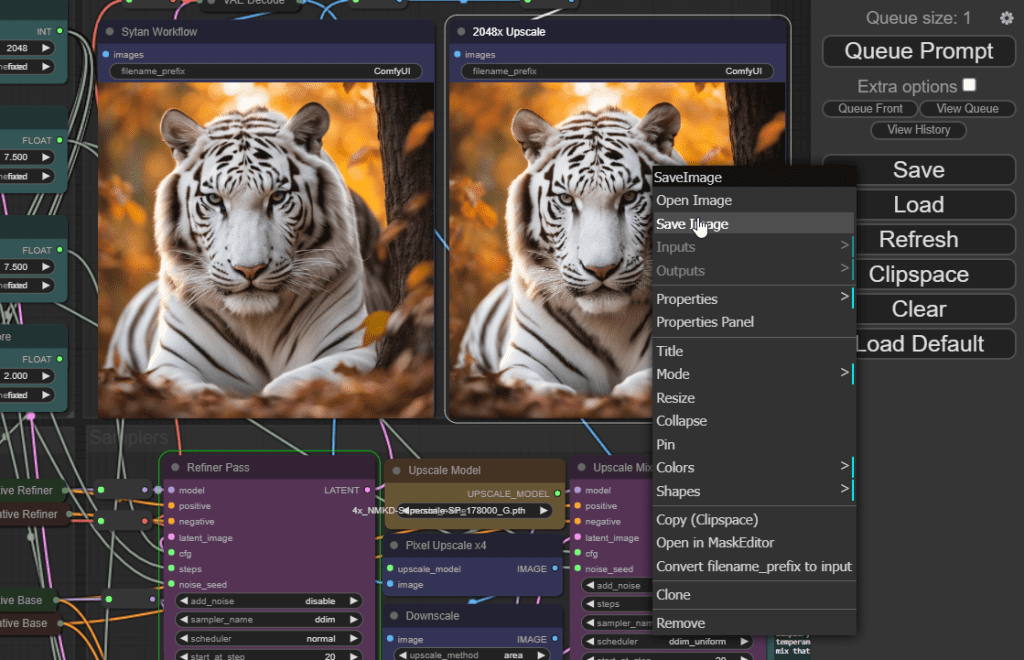
Settings
Let's take a look at some of our settings. If you're coming from another Stable Diffusion interface, some of these settings will look familiar, others will be completely new.
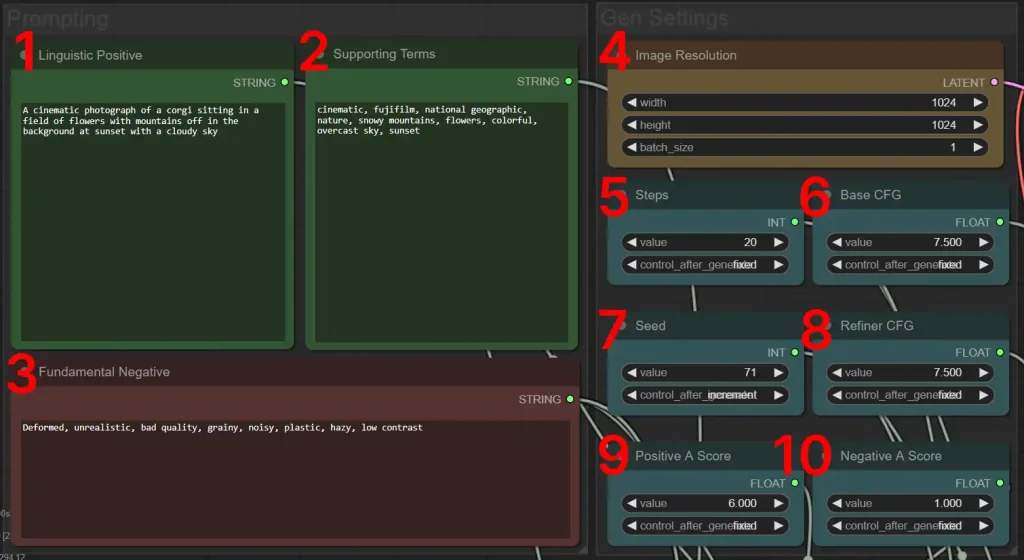
1. Linguistic Positive
Notice that you can input 2 prompts: Linguistic Positive and Supporting Terms.
Stable Diffusion needs to "understand" the text prompts that you give it. To do this, it uses a text encoder called CLIP.
Whereas previous Stable Diffusion models only had one text encoder, SDXL v1.0 has two text encoders:
- text_encoder (CLIPTextModel) also known as CLIP_G: this is the encoder that was used for Stable Diffusion v2.0 & v2.1
- text_encoder_2 (CLIPTextModelWithProjection) also known as CLIP_L: this is the encoder that was used for Stable Diffusion v1.4 & v.15
This means you can pass each text encoder a different prompt.
Sytan's SDXL workflow gives the Linguistic Postive to CLIP_G.
CLIP_G is better at interpreting natural language sentences, so that's the style you would use for the Linguistic Positive eg. 35mm photo of a person on a park bench
2. Supporting Terms
Sytan's SDXL workflow gives the Supporting Terms to the CLIP_L text encoder.
CLIP_L is better at interpreting comma separated tags, so that's the style you would use for the Supporting Terms eg. nikkor lens, kodachrome, gravel floor, shrubbery, foliage.
3. Fundamental Negative
The negative prompt goes here.
4. Image Resolution
For best results, keep height and width at 1024 x 1024 or use resolutions that have the same total number of pixels as 1024*1024 (1048576 pixels)
Here are some examples:
- 896 x 1152
- 1536 x 640
SDXL does support resolutions for higher total pixel values, however res
5. Steps
This is the combined steps for both the base model and the refiner model. The default value of 20 is sufficient for high quality images.
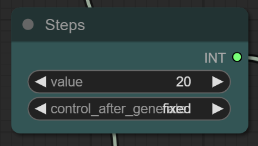
Notice the nodes First Pass Latent and Second Pass Latent. Both have fields start_at_step and end_at_step.

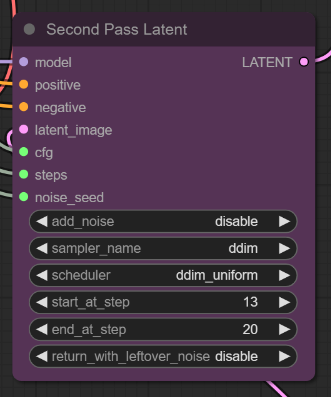
For best results, you Second Pass Latent end_at_step should be the same as your Steps value.
The end_at_step value of the First Pass Latent (base model) should be equal to the start_at_step value of the Second Pass Latent (refiner model).
6. Base CFG
CFG is a measure of how strictly your generation adheres to the prompt. Higher values mean rigid adhererance to the prompt, lower values mean more freedom.



The default value of 7.5 is a good starting point.
7. Seed
You can optionally set a seed.
8. Refiner CFG
The default of 7.5 is fine.
9. Positive A Score
SDXL comes with a new setting called Aesthetic Scores. This is used for the refiner model only.
The training data of SDXL had an aesthetic score for every image, with 0 being the ugliest and 10 being the best-looking.
By setting your SDXL high aesthetic score, you're biasing your prompt towards images that had that aesthetic score (theoretically improving the aesthetics of your images).
10. Negative A Score
SDXL low aesthetic score is more confusing. It sets the "bias" your negative prompt. Usually, you want this bias to resemble images that had a low aesthetic score...so this works in the reverse of high aesthetic score. The lower this value is, the better your images will look and vice-versa.
ComfyUI Workflows
You can use any existing ComfyUI workflow with SDXL (base model, since previous workflows don't include the refiner). Here are some to try:
“Hires Fix” aka 2 Pass Txt2Img
Upscale Models (ESRGAN, etc..)
Next Steps
Check out these prompts to try in SDXL v1.0!



Hello,
I would like to create abîmé characters by using comfyui. Where can I find a work flow for cetus-mix-V2?
Hello Daki, all existing workflows will be compatible with that model.
When I try to run, this erros arrise:
Prompt outputs failed validation
CheckpointLoaderSimple:
– Value not in list: ckpt_name: ‘SDXL Base.safetensors’ not in [‘sd_xl_base_1.0.safetensors’, ‘sd_xl_refiner_1.0.safetensors’]
Did you select your base and refiner models from the dropdowns in the Load Model nodes?
Should we download the Sytan SDXL Workflow v0.5.json and not the Sytan’s SDXL 1.0 Workflow .json?
That’s correct, thank you. I published this when 1.0 wasn’t out yet. I’ve updated the article.